OpenWrt Forum Archive

Topic: [How To]Debrick WA7510N v1 Original Firmware

The content of this topic has been archived on 2 Apr 2018. There are no obvious gaps in this topic, but there may still be some posts missing at the end.

Today i will show you how i debricked my WA7510N.May also work on WR741, WR841 and WA901.

First i will tell you how i bricked it.
I installed OpenWRT in my router.Then i fed up openwrt because it dosen't have DFS channels.So i tried "mtd -r write tplink.bin" but it shows unable to erase block.Then i tried "mtd -r write tplink.bin linux".(Bricked my router).Then i turned it of.After some time i turned it on the router only power up and the LAN going up and down again and again.Then i read out OpenWRT Serial Debrick.

So i bought a CP2102 USB 2.0 to TTL UART SERIAL CONVERTER at $2.73(170 Rupee).

Now the debrick begins
You need the following things.
1.CP2102 USB 2.0 to TTL UART(http://www.ebay.in/itm/CP2102-USB-2-0-to-TTL-UART-SERIAL-CONVERTER-Arduino-ARM-and-other-MCU-/111628421203?)

2.Putty for serial access.(http://www.chiark.greenend.org.uk/~sgta … nload.html)

3.TFTP by Jounin(http://tftpd32.jounin.net/tftpd32_download.html).

4.TL-WA7510N firmware"TL-WA7510N_v1_111130"(http://babblecase.com/22cA)Use only this firmware for debrick then upgrade to the available latest verison.Use the first firmware ,doan't flash latest firmware on the router applicable on these also WR741, WR841 and WA901.Download the oldest firmware with same version to debrick.

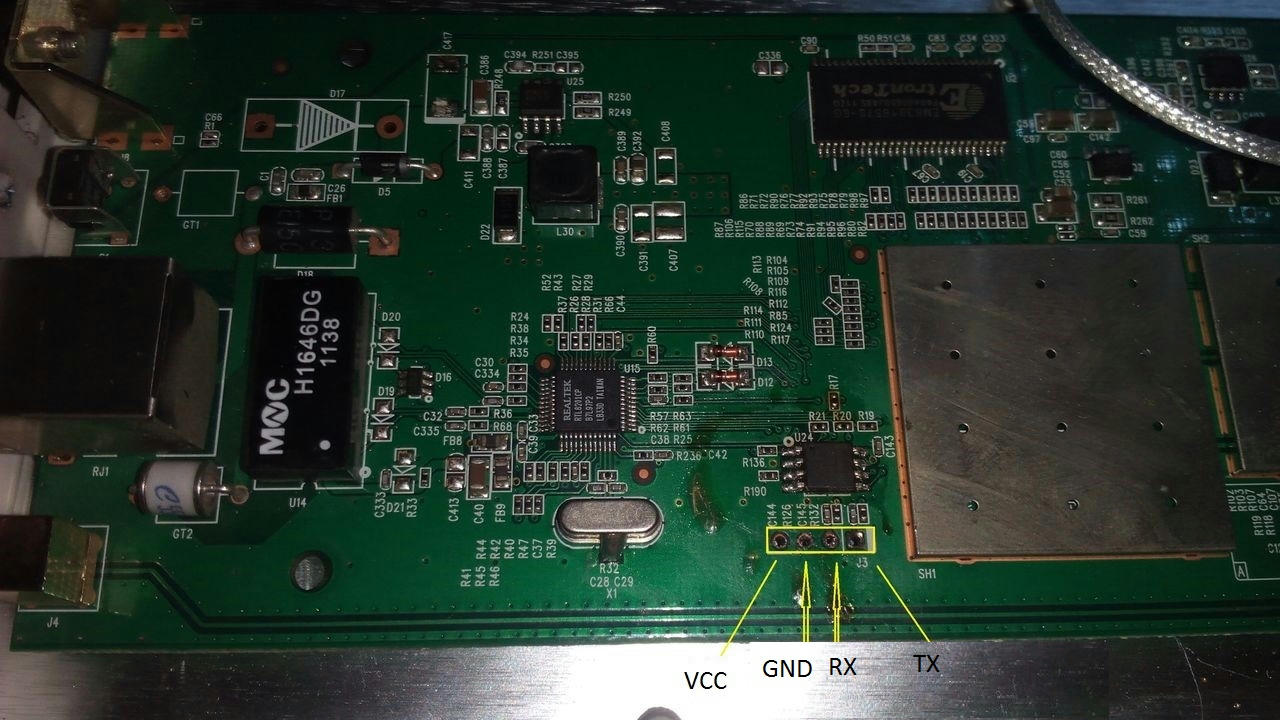
Now connect the TX of CP2102 to RX of WA7510N , RX of CP2102 to TX of WA7510N and GND of CP2102 to the GND of WA7510N.
----Change your computer Ethernet setting to IP Address 192.168.1.2 , Subnet Mask 255.255.255.0 and Gateway 192.168.1.1(optional).

----Now plug your CP2012 to your Computer/Laptop USB port.

----Now open TFTP.In the directory where the TFTP is installed copy the firmware file of WA7510N and rename it to tplink.bin


----Now open putty and Select Serial now in serail line box enter the COM port of your serial interference and set speed to 115200.

----Now in putty you will get something like this

AP93 (ar7240) U-boot
DRAM:  
sri
#### TAP VALUE 1 = 9, 2 = 9
32 MB
id read 0x100000ff
flash size 4194304, sector count = 64
Flash:  4 MB
Using default environment

In:    serial
Out:   serial
Err:   serial
Net:   ag7240_enet_initialize...
No valid address in Flash. Using fixed address
: cfg1 0xf cfg2 0x7014
eth0: 00:03:7f:09:0b:ad
eth0 up
No valid address in Flash. Using fixed address
: cfg1 0xf cfg2 0x7214
eth1: 00:03:7f:09:0b:ad
ATHRS26: resetting s26
ATHRS26: s26 reset done
eth1 up
eth0, eth1
Autobooting in 1 seconds

Now type "tpl" without quotes. in one second.If you can't,just type tpl somewhere and copy it then in putty when it shows Autobooting in 1 second just click the right button of the mouse.Now you got the access to the serial control.

In serial console type
setenv ipaddr 192.168.1.1
setenv serverip 192.168.1.2
printenv

Now type tftpboot 0x80000000 tplink.bin

Now this is shown in your

ar7240> tftpboot 0x80000000 tplink.bin
Using eth0 device
TFTP from server 192.168.1.2; our IP address is 192.168.1.1
Filename 'tplink.bin'.
Load address: 0x80000000
Loading: checksum bad
#################################################################
         #################################################################
         #################################################################
         #################################################################
         #################################################################
         #################################################################
         #################################################################
         #################################################################
         #################################################################
         #################################################################
         #################################################################
         #####################################################
done
Bytes transferred = 3932160 (3c0000 hex)

Now type these commands

ar7240> erase 0x9f020000 +0x3c0000
...
ar7240> cp.b 0x80000000 0x9f020000 0x3c0000
ar7240> bootm 0x9f020000

Now your router is debricked!
Now remove all the serial console from the router and shut down the router and then turn on the router.
Now go to the IP address  192.168.1.254

If you want to upgrade your router to OpenWRT you can do that.

(Last edited by siddhantpatel001 on 25 May 2017, 07:00)

I have the same problem but  my router is 5210G.
and I have a DKU5 CABLE .
I have also post this problem here
https://forum.openwrt.org/viewtopic.php … 81#p270881

http://s25.postimg.org/ozxpoorq7/PCB_OF_5210_G.jpg
http://s25.postimg.org/7wc3qu0kb/DKU5_CABLE.jpg
I have read some topic about serial cable method,
the circuit  board has 4 pin .
1. TX
2. RX
3.GND
4.VCC
But which one is the 1st one .  ?    I am confuse here .
if any body help me .

First you need to correct the serial pinouts.See the picture.

PunBB bbcode test

Now connect the White Cable of DKU-5 with the GND of the router
Blue Cable with the TX.
Red Cable with the RX.
Note:-Don't connect the VCC or you will fry your router.

Change your computer IP settings to
IP Address 192.168.1.100
Subnet Mask 255.255.255.0
Gateway IP 192.168.1.20 (Optional)

Now connect the DKU-5 cable with your computer and power on the router.If the WA5210G is that router that you converted into UBNT NanoStation 2 so you need the following method.

Open Putty,and in the putty use these settings
For any terminal program, the important (default) settings are:
Baud Rate: 9600
Data Bits: 8
Stop Bits: 1
Parity: None
Flow Control: None

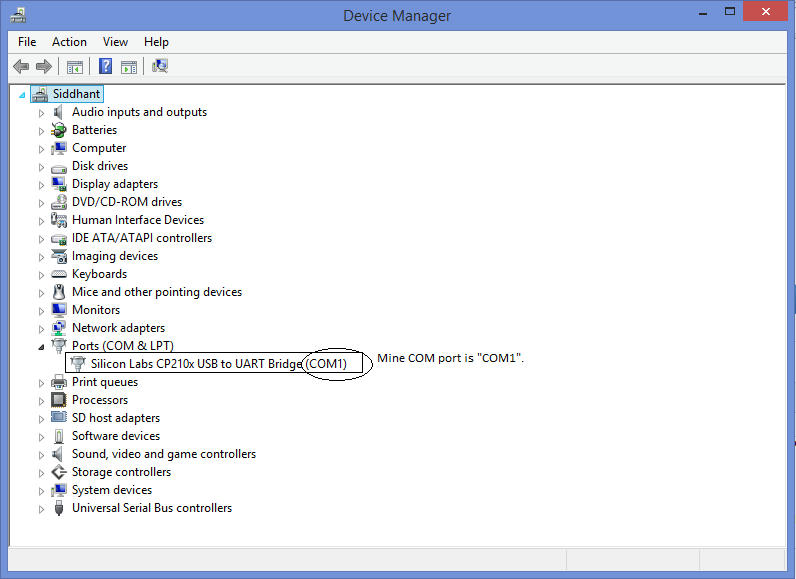
Choose the COM-port of the DKU-5,if you don't know what is the com-port so this,..
1.Open device manager.
2.In ports see you DKU-5 com port.

PunBB bbcode test

Now you see COM port now do the setting in putty.
And then click on open,
You will get access to the serial console

RedBoot>

At this prompt we can put the NanoStation into Recovery mode.
Type the following:

RedBoot>urecovery

You should start seeing some text scrolling by asking about a TFTPD. This is how we are going to upload our .bin (firmware) to the device.

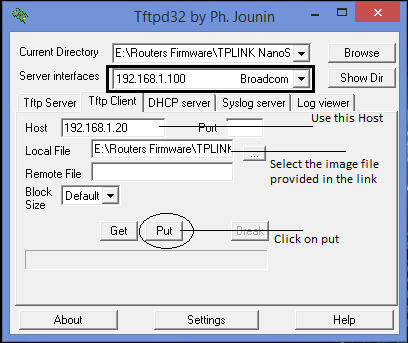
Now open TFTPD32 in your computer and do the settings as follows

PunBB bbcode test

Signal LEDs will keep blinking one by one in 4 different colors during firmware upgrade. Wait for about 7-10 minutes (devices and firmware depending) - do not power off the device during procedure!

Conclusion:

You should now have a “fully recovered” piece of hardware. Try to not break it again wink

The NanoStation2 will be running with full factory default settings at this point and will allow you to login with the username of “ubnt” and password of “ubnt” on the default IP of “192.168.1.20”. Make sure to setup your systems network interface with an IP address of “192.168.1.254” or something similar so you will be able to access the hardware.

Use this firmware file:-
http://riffhold.com/2Kor

(Last edited by siddhantpatel001 on 25 May 2017, 07:03)

When I plug my dku-5 cable it show  serial port  " COM4 "

also I want to know ,  does 5210G need to plug  LAN Cable to its POE injector or not ?

Yes you need to power on your WA5210G using POE.
1.You need to connect the nokia cable to your computer
2.Then open Putty and select your COM port and and select speed 9600 then go to connection in connection the select serial and then select flow control none then click on Open.
3.A window will appear,then connect to POE to your router.Then in the putty serial window you will see something press Ctrl+C repeatedly.You will get the prompt to Redboot console
Like this

RedBoot>(Type here urescue).
Redboot>(Then it will waits for TFTPD connection at IP Address 192.168.1.20).

Open TFTPD32 and select your server interfaces
Click on TFTP Client Tab.

Type "Host":192.168.1.20
Leave "Port"
Select "Local File" select the attached firmware file (http://riffhold.com/2Kor)

Then Click on put,in Putty console you will see some scrolling texts.Wait 5-7 minutes your router will reboot automatically.After the reboot of your router remove Nokia Cable and in web browser put 192.168.1.20.You will get your router live again.

(Last edited by siddhantpatel001 on 25 May 2017, 07:03)

I have been followed but didn't succeed .
it goes up to this.  look at this image
  http://s25.postimg.org/4uma75xsv/Untitled2.jpg
then I try on TFTP32
it doesnt upgrade the firmware .
I "v  followed your method correctly .
http://s25.postimg.org/xyai3elwf/tftp32.jpg
http://s25.postimg.org/xzkfwtnq3/lan_ip_add.jpg

siddhantpatel001 wrote:

Yes you need to power on your WA5210G using POE.

RedBoot>(Type here urescue).
Redboot>(Then it will waits for TFTPD connection at IP Address 192.168.1.20).
.


tell me more detail about
redboot> (type here urescue)

If You have followed my method correctly ?
but why this strange problem is coming.
Try the methods again.

Are you able to access the redbootloader after flashing the firmware.
1.First turn off the device disconnect everything from the device
2.Open Putty and follow the settings
Open Putty,and in the putty use these settings
For any terminal program, the important (default) settings are:
Baud Rate: 9600
Data Bits: 8
Stop Bits: 1
Parity: None
Flow Control: None
(Important)
3.Then plug your DKU-5 Cable to your computer.
4.After the cable gets detected.In Putty click on Open
5.The the window will open in the window press Ctrl+C have have access to the redbootloader.(You need prefect timing to have the access).
You will get like this
RedBoot>

Now use the command as follows
RedBoot>urescue
This will start a TFTP server in the router and then you will open TFTPD and select the Flash file set the IP and then click on Put.The TFTPD 32 will show the Transferred Data. And the Putty also shows something.Now wait for 5-10 minutes do not power off the router.
Now after the router reboots plug/remove off all the wires and power cables to the router.
Now after 5-10 sec. plug the POE and connect the ethernet to your PC.Open any browser and then type there 192.168.1.20.And see that if you have the access to router GUI.If yes Cheers UP!

(Last edited by siddhantpatel001 on 8 Dec 2017, 08:49)

After follow this steps, this errot is show to me.
How to fix that?

TFTPD: Error 2: CRC error
TFTPD: Error 4: Illegal TFTP operation 

--------------------------------------------↓↓↓↓↓↓---------------------------------------------------------------------

MicroRedBoot v1.4, (c) 2009 DD-WRT.COM (Dec 26 2012 REVISION Unversioned directory)
CPU Type: Atheros AR2315/6/7/8
CPU Clock: 184Mhz
Found Flash device SIZE=0x00400000 SECTORSIZE=0x00010000 FLASHBASE=0xBFC00000
Reset Button triggered
Booting Recovery RedBoot
reset button 5 seconds pushed, erasing nvram
nvram can and will not erased, since nvram was not detected on this device (maybe dd-wrt isnt installed)!
loading....

▒No board config data found!
+Reset button pressed - switching to rescue mode.
**Warning** FLASH configuration checksum error or invalid key
Use 'fconfig -i' to [re]initialize database
Couldn't find valid MAC address for enet0. Using default!
Ethernet eth0: MAC address 00:03:7f:e0:02:bf
IP: 192.168.1.20, Default server: 0.0.0.0

RedBoot(tm) bootstrap and debug environment [RAM]
Non-certified release, version (patched for dump flashing) - built 12:50:19, Dec 26 2012

Copyright (C) 2000, 2001, 2002, 2003, 2004 Red Hat, Inc.
Copyright (C) 2009 NewMedia-NET GmbH

Board: ap51
RAM: 0x80000000-0x81000000, [0x8002fab0-0x80fed000] available
FLASH: 0xbfc00000 - 0xbfff0000, 64 blocks of 0x00010000 bytes each.
Starting RESCUE script...
== Executing boot script in 3.000 seconds - enter ^C to abort
RedBoot> tftpd
Warning: memory buffer for uploaded file may be on reserved RAM area.
TFTPD is running (using memory ranges: 0x8002fc00 - 0x8092fc00).
TFTPD: Connect from 192.168.1.100 port 59263
TFTPD: Upload completed (got 3313591 bytes).
Checking uploaded file...
DUMP_FW: Bad dump header
header dump: 0x55 0x1A 0x0B 0x06

TFTPD: Error 2: CRC error
TFTPD: Error 4: Illegal TFTP operation

The discussion might have continued from here.