OpenWrt Forum Archive

Topic: [HowTo] Openwrt cheap Digital Stereo WiFi Internet Radio & MP3 Player

The content of this topic has been archived between 7 Apr 2018 and 5 May 2018. There are no obvious gaps in this topic, but there may still be some posts missing at the end.

If anyone is interested I also created an home automation server with Openwrt smile
Let me know and I will eventually create a specific How To.
Please read also: https://forum.openwrt.org/viewtopic.php … 90#p253590

http://www.lovisolo.com/asterisk/software/openwrt/asterisk.jpg

(Last edited by pilovis on 30 Dec 2014, 22:14)

New feature added to the WiFi Internet Radio & MP3 Player smile

-----------------------------------------------------------------------------
Mount an external USB CD-ROM to play MP3 files stored on a CD
-----------------------------------------------------------------------------

opkg update
opkg install kmod-scsi-cdrom
opkg install kmod-scsi-core
opkg install kmod-scsi-generic
opkg install kmod-fs-isofs

Reboot the router

Connect and mount the USB CD-ROM (ISO9660 filesystem):

mkdir -p /mnt/cdrom
mount /dev/sr0 /mnt/cdrom

Command to play in sequence all .mp3 files present on a CD:

find /mnt/cdrom -name \*[mM][Pp]3 | awk '{print "\""$0"\""}' | xargs madplay - &

http://4.bp.blogspot.com/_Nd5o6jQ_tHg/TMKnUGnLirI/AAAAAAAACok/dFq7c720xcE/s400/External-CD-ROM-USB2-0-24x-.jpg

I'm also trying to add Audio CD playback capability ...

Install cdparanoia:
opkg install http://downloads.openwrt.org/barrier_br … ar71xx.ipk

cdparanoia -Z -q -w "1" - | aplay &
it works, but choppy audio playback (buffer underrun) sad

cdparanoia -Z -q -w "1" - | buffer | aplay &
it would be perfect, but "buffer" program is not implemented in openwrt sad

cdparanoia -Z -q -w "1" tmp.wav ; aplay tmp.wav &
it works, audio OK, but needs to create a temporary file (about 30-40 MB), also playing won't start until the temporary file is fully created (about 20-30 seconds total delay) yikes

note: "1" = track 1,  "2" = track 2, etc.

(Last edited by pilovis on 11 Nov 2014, 16:44)

pilovis wrote:

https://fbcdn-sphotos-e-a.akamaihd.net/hphotos-ak-xpf1/t1.0-9/10464185_824314937581587_5496787119950523420_n.jpg

https://scontent-a-mad.xx.fbcdn.net/hphotos-xpf1/t1.0-9/q72/s480x480/10402449_825552500791164_4901113012438161701_n.jpg

How to control relay module?

hoatienii wrote:

How to control relay module?

My relay board needs 3V signal input, I simply get this signal from router Led's catode (pull up leds) and use GPIO led to control on/off state.

NOTES:
1) almost all routers start blinking leds on the startup sequence, so you need to delay the activation (power on) of the relay boards until the router is fully booted.
2) the signal from led catode is inverted: when the led is OFF the signal voltage is high = relay ON , when the led is ON the signal voltage is low = relay OFF.

schematic example of the internal router led connection:

http://www.msgpio.com/manuals/gpo_led.gif

(Last edited by pilovis on 10 Nov 2014, 07:39)

pilovis wrote:
hoatienii wrote:

How to control relay module?

My relay board needs 3V signal input, I simply get this signal from router Led's catode (pull up leds) and use GPIO led to control on/off state.

NOTES:
1) almost all routers start blinking leds on the startup sequence, so you need to delay the activation (power on) of the relay boards until the router is fully booted.
2) the signal from led catode is inverted: when the led is OFF the signal voltage is high = relay ON , when the led is ON the signal voltage is low = relay OFF.

You control relay via web interface or ssh?

hoatienii wrote:

You control relay via web interface or ssh?

Both, also by SMS (gnokii)

(Last edited by pilovis on 10 Nov 2014, 07:42)

pilovis wrote:

Both, also by SMS (gnokii)

Please post more guide! Thanks!

Quick and Mini How-to:

"OpenWRT - Controlling leds and a simple 5V relay board via Web interface"
on TP-Link TL-WR741nd with OpenWRT Backfire.


Led commands (example for "SYS" led = DS1 on PCB)
-----------------------------------------------------------------

led green:system (1= led on - 0= led off):

   /bin/echo 1 > /sys/devices/platform/leds-gpio/leds/tl-wr741nd:green:system/brightness
   /bin/echo 0 > /sys/devices/platform/leds-gpio/leds/tl-wr741nd:green:system/brightness


Note: the other available led is QSS : tl-wr741nd:green:qss


Check led state
---------------------


  cat /sys/devices/platform/leds-gpio/leds/tl-wr741nd:green:system/brightness 


Startup settings ( /etc/rc.local)
-------------------------------------

/bin/echo none > /sys/devices/platform/leds-gpio/leds/tl-wr741nd:green:system/trigger
/bin/echo 1 > /sys/devices/platform/leds-gpio/leds/tl-wr741nd:green:system/brightness
exit 0


cgi-bin
--------

/www/cgi-bin/on.cgi:

  #!/bin/ash
   #switch ON the relay board = led off
   echo 'ON'
   /bin/sh /root/on
  # sending email notification of status change
  # opkg install mini_sendmail
   cat /www/cgi-bin/enabled.txt | mini_sendmail -fsender@domain.com -ssmtp.domain.com -p25 user@domain.com


/www/cgi-bin/off.cgi:

  #!/bin/ash
   #switch OFF the relay board = led on
    echo 'OFF'
    /bin/sh /root/off
   # sending email notification of status change
   # opkg install mini_sendmail
    cat /www/cgi-bin/disabled.txt | mini_sendmail -fsender@domain.com -ssmtp.domain.com -p25 user@domain.com


/www/cgi-bin/test.cgi:

   #!/bin/ash
   #check status of relay board: activated when led = off, deactivated when led = on
   echo '0 = Activated, 1 = Deactivated'
   echo ' '
   /bin/cat /sys/devices/platform/leds-gpio/leds/tl-wr741nd:green:system/brightness


/www/cgi-bin/enabled.txt:

   #subject for the email notification   
   subject: Activated!


/www/cgi-bin/disabled.txt:

  #subject for the email notification   
   subject: Deactivated!


Scripts:
---------

/root/on:

   #switch ON the relay board = led off
   /bin/echo 0 > /sys/devices/platform/leds-gpio/leds/tl-wr741nd:green:system/brightness


/root/off:

#switch OFF the relay board = led on
   /bin/echo 1 > /sys/devices/platform/leds-gpio/leds/tl-wr741nd:green:system/brightness


-----------------------------------------------
Important Notes:

- All cgi and scripts need "chmod 777"
- The signal from led catode is inverted: when the led is OFF the signal voltage is high = relay ON , when the led is ON the signal voltage is low = relay OFF
- The router starts blinking all leds on the startup sequence for several seconds, to avoid the relay board triggering on and off during router bootup, you need to (hardware) delay the activation of the relay boards until the router is fully booted, you may use a NE555 timer or a digital/relay logic.
-----------------------------------------------


Web control panel (basic example)
-----------------------------------------

/www/index.html:

------------------------------------------------
<br>
CENTRALINA DI COMANDO
<br>
------------------------------------------------
<p>
<FORM ACTION="/cgi-bin/off.cgi">
<INPUT TYPE=SUBMIT VALUE="Switch off">
</FORM>
<FORM ACTION="/cgi-bin/on.cgi">
<INPUT TYPE=SUBMIT VALUE="Switch on">
</FORM>
<p>
------------------------------------------------
<br>
STATUS CHECK
<br>
------------------------------------------------
<p>
<FORM ACTION="/cgi-bin/test.cgi">
<INPUT TYPE=SUBMIT VALUE="check status">
</FORM>

<p>
------------------------------------------------
<form action="luci.html">
<input type="submit" value="Luci control panel">
</form>
<p>
------------------------------------------------
<p> by P.M. Lovisolo 2014


-----------------------------------------

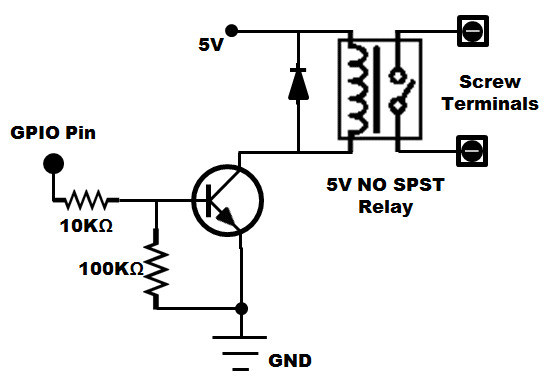
GPIO pin (3V) = Led Catode of DS1 (Sys led) close to C382, opposite to "+" label
Transistor = 2n2222 or equivalent
Diode=1n4004 or equivalent
Resistors = 1/4W 5 or 10%

Note: you may add a red led with a 1Kohm drop resistor in parallel to the relay coil.

http://2.bp.blogspot.com/-L-UOlMsomPw/UGrXD5zr2iI/AAAAAAAAAJU/AgIuzHv97ZM/s1600/Relay-revised.gif

Be very careful when soldering!
After the soldering process, block the connection wires to the PCB with a drop of glue to prevent pulling fragile pads away from pcb!

(Last edited by pilovis on 24 Dec 2014, 15:46)

pilovis wrote:

I've just updated the How To, I added instructions for Barrier Breaker 14.07 (tested on TP-Link TL-WR710N) and corrected some typos.
smile

P.S.: I also successfully tested this audio device:

http://www.music4company.com/images/Products/0-5ce1deb0-500.jpg

please note you need to modify configuration files to adapt device name (from "PCM" to "Speaker") , check it with command "alsamixer".

i have this device, i can not adjust volume, it always max volume. sad

(Last edited by hoatienii on 31 Dec 2014, 04:53)

First adjust global audio volume level with command:
alsamixer

you'll be able to change audio volume level from 0 to Max,
if not, there is something wrong in the configuration files or maybe some package misssing.
Alsamixer also reports driver device name, ex.: Item: "PCM" or "Speaker"

Than, to adjust volume level with USB keyboard/Keypad and triggerhappy, use the correct device name:

ex.:

KEY_KPMINUS 1 /usr/bin/amixer -q set Speaker 1%-
KEY_KPPLUS 1 /usr/bin/amixer -q set Speaker 1%+

or:

KEY_KPMINUS 1 /usr/bin/amixer -q set PCM 1%-
KEY_KPPLUS 1 /usr/bin/amixer -q set PCM 1%+

---------------------------------------------------------------------

This was tested with Barrier Breaker and Attitude Adjustment.

(Last edited by pilovis on 31 Dec 2014, 11:14)

Could you give configure file of this audio, and package to install? thanks
http://www.music4company.com/images/Products/0-5ce1deb0-500.jpg

Alsamixer is in the alsa-utils package.

mk24 wrote:

Alsamixer is in the alsa-utils package.

thanks!

My internet radio sad : routerboard rb750 usb mod

http://www.upsieutoc.com/images/2014/10/15/IMG_20141013_104136.jpg

http://www.upsieutoc.com/images/2015/01/05/15-1.jpg

I successfully tested this USB audio I/O device:

Card: C-Media USB Headphone Set
Chip: USB Mixer
Item: PCM [dB gain: -26.88, -26.88]

http://i00.i.aliimg.com/img/pb/053/104/874/874104053_565.jpg

also, the three buttons on this device are recognized by Triggerhappy, so you can avoid using a USB keyboard/Keypad to control the Internet radio, instead you can use "Vol +" and "Vol -" buttons to control audio volume and the other large button to change radio stations or MP3 song (with MPD player playlist).

This is what Triggerhappy sees when you press the three buttons:

root@OpenWrt:~# thd --dump /dev/input/event*
EV_KEY    KEY_VOLUMEDOWN    1    /dev/input/event1
# KEY_VOLUMEDOWN    1    command
EV_KEY    KEY_VOLUMEDOWN    0    /dev/input/event1
# KEY_VOLUMEDOWN    0    command
EV_KEY    KEY_VOLUMEUP    1    /dev/input/event1
# KEY_VOLUMEUP    1    command
EV_KEY    KEY_VOLUMEUP    0    /dev/input/event1
# KEY_VOLUMEUP    0    command
EV_KEY    KEY_MIN_INTERESTING    1    /dev/input/event1
# KEY_MIN_INTERESTING    1    command
EV_KEY    KEY_MIN_INTERESTING    0    /dev/input/event1
# KEY_MIN_INTERESTING    0    command

(Last edited by pilovis on 10 Jan 2015, 13:09)

Baresip Openwrt SIP client

Baresip it's a good program but official documentation is hardly inexistent and sucks, like many small linux programs, as usual I had to figure out how to configure and use it.
How the hell do they create programs without writing a decent documentation?  mad  mad

- Prerequisites:

1) install Alsa and USB audio support
2) connect an USB audio adapter with a speaker and a microphone or a USB phone / headset (with microphone)
note: you might also use a USB webcam with internal microphone or just a USB microphone, in both cases you don't need an USB audio adapter but you won't have any speaker (one way audio)
3) adjust audio levels of speaker and microphone with command: alsamixer

note: see my other "How To" for detailed instructions how to configure USB audio: https://forum.openwrt.org/viewtopic.php … 63#p225463


- Installation and configuration of Baresip on Barrier Breaker (Baresip doesn't work on Attitue Adjustment: broken audio!):

opkg update
opkg install kmod-usb-hid
opkg install kmod-hid kmod-hid-generic
opkg install baresip baresip-mod-alsa baresip-mod-cons baresip-mod-evdev baresip-mod-g711
opkg install baresip-mod-stdio baresip-mod-uuid

Launch baresip once to generate the default configuration files on /root/.baresip:

baresip

after a few seconds stop it with ctrl+c
then you need to edit the configuration files

cd /root/.baresip

first edit "accounts" file

delete everything and insert the following line (use the values of your SIP accont):

<sip:user:password@sip-provider.com:port>;stunserver=stun:stun.ekiga.net

Note: you can add optional parameters to this line just by adding one or more of them with the following format:
<sip:user:password@domain;uri-params>;addr-params

example:
<sip:user:password@sip-provider.com:5060;transport=udp>;answermode=auto;stunserver=stun:stun.ekiga.net

list of optional URI params:

#    ;transport={udp,tcp,tls}

list of optional addr-params:

#    ;answermode={manual,early,auto}
#    ;audio_codecs=speex/16000,pcma,...
#    ;auth_user=username
#    ;mediaenc={srtp,srtp-mand,srtp-mandf,dtls_srtp,zrtp}
#    ;medianat={stun,turn,ice}
#    ;outbound="sip:primary.example.com;transport=tcp"
#    ;outbound2=sip:secondary.example.com
#    ;ptime={10,20,30,40,...}
#    ;regint=3600
#    ;regq=0.5
#    ;rtpkeep={zero,stun,dyna,rtcp}
#    ;sipnat={outbound}
#    ;stunserver=stun:[user:pass]@host[:port]


then edit  "config" file

delete everything and insert the following lines:

#comments added by pilovis
#
poll_method             epoll
input_device            /dev/input/event0                        #eventually adapt input device for your system
input_port              5555
sip_trans_bsize         128
audio_player            alsa,default                                  # audio speaker device
audio_source            alsa,default                                 # audio microphone device
audio_alert             alsa,default                                   # audio ring device
#
# if you want to use more than one audio device you need to use: alsa,default:CARD=devicename
# to discover device name use command: aplay -L
# -----------------------------------------------------------
audio_srate             8000-48000
audio_channels          1-2
rtp_tos                 184
rtcp_enable             yes
rtcp_mux                no
#jitter_buffer_delay     15-35  # uncomment this line only in case you use an external voip provider and you experience high ping latence
rtp_stats               no
dns_server              8.8.8.8:53                                   # use your preferred DNS server
module_path             /usr/lib/baresip/modules
module                  stdio.so
module                  evdev.so
module                  g711.so
module                  alsa.so
module                  stun.so
module                  turn.so
module_tmp              account.so
module_app              contact.so
module_app              menu.so
natbd_server            creytiv.com  # I'm not sure this line is necessary when you set "stunserver" option on user account
                                                   # and/or for local accounts: <user:password@localhost>
natbd_interval          600             # same as above, you might try to comment "#" both lines and test if baresip works
# eof

Launch Baresip:

baresip

then press "?" for all available commands

-------------------------------------------------------------------------------------

- Baresip remote audio monitoring

Make an automatic SIP phone call with the following command:

(/bin/echo sip:other-user@voip-provider.com; /bin/sleep 60; /bin/echo q) | /usr/bin/baresip -f /root/.baresip -e d

Note: "sleep 60; echo q" set the total call duration time at 60 seconds including ring time, after that "quit" command is sent to baresip, even if the remote party has not answered the call yet.

When the remote party answers the phone, he/she hears the ambient audio captured from the local microphone, also if he/she talks, his/her voice is sent to the local speaker (if connected and active).

-------------------------------------------------------------------------------------------------

- Launch Baresip as a daemon and configure it to auto answer all incoming calls

first configure baresip for auto answer all incoming calls by editing the "/root/.baresip/accounts" file as the following:

<sip:user:password@sip-provider.com:5060;transport=udp>;answermode=auto;stunserver=stun:stun.ekiga.net

then launch it as a daemon with the following command:

/usr/bin/baresip -f /root/.baresip -d

then try to call your local sip account, baresip won't ring but will answer the call and will start streaming the local audio to you (remote caller), same as above, if you talk,  people near to the openwrt router will hear your voice through the speaker (speakerphone mode)

NOTE: if you use baresip as a daemon and you also want to issue an automatic call from local (openwrt) to remote (eg.: your mobile), you should change the previous auto call command to the following:

(/bin/echo sip:other-user@voip-provider.com; /bin/sleep 60; /bin/echo b) | /usr/bin/baresip -f /root/.baresip -e d

basically here we are sending "b" command (HANGUP CALL) to baresip instead of "q" (QUIT BARESIP) because we want to keep baresip running in background.

If you want to use a USB Voip phone or a USB headset but you want to have a separate speaker that rings for the incoming calls, you need an extra USB audio adapter for the speaker, alsa will recognize it with a different device name, then you just need to modifiy "config" file as the following:

audio_player            alsa,default:CARD=headset_devicename
audio_source            alsa,default:CARD=headset_devicename
audio_alert             alsa,default:CARD=other_devicename

note: to find the two device names launch command: aplay -L 
----------------------------------------------------------------------------------------

- USB Keypad

if you connect an USB numeric keypad to your router, you can use it to answer the incoming calls (Enter Key) and/or to dial phone numbers followed by "Enter" key to start the call.
To hangup/cancel the call press "Del" key.

Note: if you want to use the keypad to accept incoming calls by pressing "Enter", you need to modify the account configuration file as the following:

<sip:user:password@sip-provider.com:5060;transport=udp>;answermode=manual

http://www.lindy.co.uk/images/usb-numeric-keypad-p763-1172_zoom.jpg

If you use a USB Phone you don't need the USB audio adapter.

http://blog.ashfame.com/wp-content/uploads/2008/02/usb_phone.jpg

if you install "kmod-usb-cm109" you can use some (old) USB Voip phones with support of their integrated keys, like
KIP 1000, G-talk , Atcom au100, Allied-Telesis Corega USBPH01, same for "kmod-usb-yealink" that support Yealing Voip phones.

http://www.komunikate.eu.com/images/kip1000.jpg http://www.voicesource.co.za/images/au-100.jpeghttp://i00.i.aliimg.com/photo/v0/493348222/Original_yealink_wireless_voip_usb_skype_phone.jpg_220x220.jpg

NOTE:

if you have installed Asterisk11 on the same router and you want to connect Baresip to local Asterisk, this is the account configuration example:

<sip:user:password@localhost>;answermode=manual


- To start Baresip at bootup but only after Asterisk has fully started, add the following line to /etc/rc.local:

/bin/sleep 10
/etc/init.d/asterisk start
/usr/bin/baresip -f /root/.baresip -d &&
exit 0

Don't use /etc/init.d/baresip enable or start, cause is broken (config path missing) and will not start at bootup nor will launch baresip daemon mad mad

(Last edited by pilovis on 31 Jan 2015, 16:11)

Another interesting music/audio player for Openwrt is "cmus" with a little nice console "graphic" interface.

opkg update
opkg install cmus

optional plugins:
opkg install cmus-plugin-oss
opkg install cmus-plugin-pulse

to lauch it:

cmus

note:
press "5" for directory list
":quit" to exit

Tutorial:
https://github.com/cmus/cmus/blob/maste … torial.txt

Official site:
http://cmus.github.io/

(Last edited by pilovis on 26 Apr 2015, 13:06)

Interesting thread. I'm running shairport-sync on OpenWRT which is working well. So far for audio output I've used:

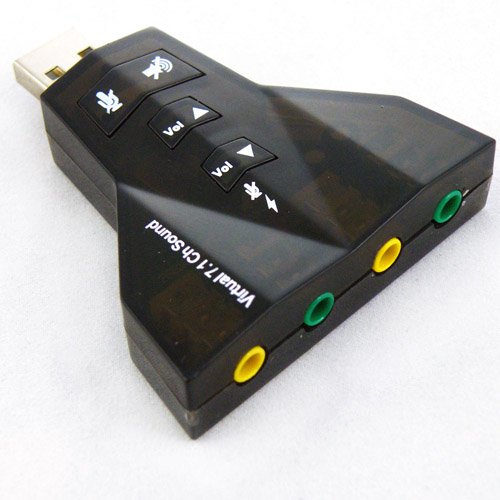
  • Cheap 5.1 virtual surround card like this. Sound quality is though rubbish and sometime broken up. Hence replaced by...

  • SoundBlaster Play - works perfectly and has fairly decent sound quality (90dB SNR). However the output is low-impedence so doesn't work well with line-ins.

  • Logitech S150 USB speakers. These work fine except that one channel is muted when first connected; run "amixer -c 0 -- sset PCM 100%" in a startup script etc to get both channels working.

The S150 speakers are in themselves fairly rubbish, however the simple USB soundcard in them is useful as it can be easily extracted and used to convert an old pair of bookshelf speakers into an active USB set for general background listening. Sound quality is surprisingly OK in this configuration, even with 6-ohm load (I used some old JPW Gold Monitors). Output is probably not even 1W but it's enough for a kitchen for example.

Shairport-Sync is particularly nice. One of my speakers has some proprietry DSP built-in that seems to have some delay but with shairport-sync the delay values can be set up so everything is spot-on smile

Hello

I have a MR3020 and i want to make the internet radio project. If i use Barrier Braker 14.07 and i wanna have more space to install packages is it correct to use exroot?

I wrote you on your YT channel Maurizio but you did not answer me unfortunately.

I wouold appreciate any help for doing this project because i am not that expert but with a litttle guide i will be able to do it.

Thank you

Enzo

omiez wrote:

Hello

I have a MR3020 and i want to make the internet radio project. If i use Barrier Braker 14.07 and i wanna have more space to install packages is it correct to use exroot?

I wrote you on your YT channel Maurizio but you did not answer me unfortunately.

I wouold appreciate any help for doing this project because i am not that expert but with a litttle guide i will be able to do it.

Thank you

Enzo

I'm sorry but I didn't get your message sad , I go to my Youtube account very rarely.
Use external USB overlay as indicated by the first post of this thread.
Tp-link TL-WR3020 was exactly the router I used to make the internet radio, but I used Attitude Adjustment, I don't know if there is enough space on wr3020 to install USB and Ext4 module for external overlay, it seems to me that once I tried but unsuccesfully.
Eventually, reflash your router with Attitude Adjustment and follow this guide step by step.

Ciao.

Maurizio

(Last edited by pilovis on 6 Feb 2015, 17:06)

Thank you Maurizio

Let me see if I understand how to use USB overlay. I am looking for a USB Audio card. I live in Brazil so it could take some days before it arrives here at my home but before I send you a link to see if it is compatible.

After installing the correct audio model driver, alsa-libs and alsa-utils, launch alsamixer, if the alsamixer interface shows up, the device is correctly detected and installed, if not, you may need to install some other usb audio driver.

Also, check with dmesg | grep usb_audio command if the adapter is detected by the system.

Here there is a long list of compatible devices:
https://mightyohm.com/forum/viewtopic.p … p;start=20

(Last edited by pilovis on 6 Feb 2015, 19:41)

I installed AA 12.09 but when i tryed to see my 3G Modem the router could not detect it.

I installed this:
comgt
kmod-usb-serial
kmod-usb-serial-option
kmod-usb-serial-wwan
usb-modeswitch
usb-modeswitch-data
luci-proto-3g

And i can see my 3G Modem, Dlink DWM-156 when i search the connected USB devices with:
cat /proc/bus/usb/devices

But when i try the command:
ls /dev/ttyUSB*

No ttyUSB device is detected.

Anyone can help?

omiez wrote:

I installed AA 12.09 but when i tryed to see my 3G Modem the router could not detect it.

I installed this:
comgt
kmod-usb-serial
kmod-usb-serial-option
kmod-usb-serial-wwan
usb-modeswitch
usb-modeswitch-data
luci-proto-3g

And i can see my 3G Modem, Dlink DWM-156 when i search the connected USB devices with:
cat /proc/bus/usb/devices

But when i try the command:
ls /dev/ttyUSB*

No ttyUSB device is detected.

Anyone can help?

Have you installed kmod-usb2, kmod-usb-ohci and kmod-usb-uhci ?

Yes i have installed everything like in first post.