Pilovis i want to thank you for your effort here and for helping.
Pilovis voglio ringraziarti per il tuo sforzo e per aver aiutato.
Sarebbe bello sapere in quale forum parlerai dei progetti pi.
Grazie
(Last edited by omiez on 15 Feb 2016, 20:38)
The content of this topic has been archived between 7 Apr 2018 and 5 May 2018. There are no obvious gaps in this topic, but there may still be some posts missing at the end.
Pilovis i want to thank you for your effort here and for helping.
Pilovis voglio ringraziarti per il tuo sforzo e per aver aiutato.
Sarebbe bello sapere in quale forum parlerai dei progetti pi.
Grazie
(Last edited by omiez on 15 Feb 2016, 20:38)
Thanks ![]()
omiez,
I've just finished a very sofisticated Home Burglar Alarm (release 2.0) with video motion detection, with the following features:
- on motion detection automatic picture/video recording,
- on motion detection audio(local)/mail/SMS alerts,
- on motion detection automatic phone call (ambient speakerphone mode)
- on motion detection external relay activation (light or other device)
- Infrared/Android/Web browser/SMS remote control.
This project mainly uses USB support, Motion, Gnokii, Alsa, msmtp, CGI & PHP languages and a lot of cgi/php/bash programming.
The original project was developped with OpenWRT Barrier Breaker on Tp-LINK TL-WDR3600 router (I choosed it because of its 128 Mbytes ram and 560 Mhz CPU).
I was thinking to put the complete How-To here, but after intensive testing I discovering some criticity and instability of the Openwrt system (not related to this specific router), I'm now thinking to move the entire project to Raspberry.
I will eventually put the new How-To in a Raspberry dedicated forum.
I will let you know.
(Last edited by pilovis on 17 Feb 2016, 16:40)
But moving to Raspberry Pi means only moving to another device. The RPI is also supported by Openwrt.
I won't use OpenWRT on Raspberry but Raspbian.
(Last edited by pilovis on 17 Feb 2016, 16:41)
I performed many tests on Raspberry PI Wheezy and changed my idea, I found it extremely slow compared to a router with OpenWRT and very instable too.
Also I tested Rasperry PI with OpenWRT Barrier Breaker, worst than before, too many packages missing!
I think I will go back to my TP-link TL-WRD3600 with OpenWRT Barrier Breaker, the best solution I've found up to now.
I will soon post a new project ![]()
(Last edited by pilovis on 14 Apr 2016, 11:49)
Nice web interface for MPD server that can be easily installed to openWRT (see below):
Project page: https://github.com/tompreston/MPD-Web-Remote
NOTE: this interface needs Chrome browser to be correctly displayed.
The advantage of this web interface is that you don't need to install anything from the client side and it works on any system: Windows, Mac, Linux, Android, Iphone ![]()
*** Instructions how to install it on OpenWRT
1) Install packages for PHP support
opkg update
opkg install php5 php5-cgi
2) Configure uhttpd web server for PHP
edit file "/etc/config/uhttpd" (add two lines to enable PHP):
config uhttpd 'main'
list listen_http '0.0.0.0:80'
list listen_http '[::]:80'
list listen_https '0.0.0.0:443'
list listen_https '[::]:443'
option home '/www'
option rfc1918_filter '1'
option max_requests '3'
option max_connections '100'
option cert '/etc/uhttpd.crt'
option key '/etc/uhttpd.key'
option cgi_prefix '/cgi-bin'
option script_timeout '60'
option network_timeout '30'
option http_keepalive '20'
option tcp_keepalive '1'
option ubus_prefix '/ubus'
option config '/etc/httpd.conf'
option interpreter '.php=/usr/bin/php-cgi'
option index_page 'index.php index.html'
config cert 'px5g'
option days '730'
option bits '1024'
option country 'DE'
option state 'Berlin'
option location 'Berlin'
option commonname 'OpenWrt'
3) create working directory:
mkdir /www/music
4) download and copy files:
https://github.com/tompreston/MPD-Web-R … master.zip
extract all the files you'll find inside of the directory "MPD-Web-Remote-master" (on the zip) and copy them to the directory "/www/music" of your router
Note: do not copy the "MPD-Web-Remote-master" directly to /www/music, just copy all files from inside this directory to /www/music.
5) restart system
restart your router
6) adding radio stations
To add internet radio stations use the following command:
mpc add (sreaming-url)
example: mpc add http://144.76.106.52:7000/chillout.mp3
Now you can access the web interface from http://ip-of-your-router/music
example: http://192.168.1.1/music
Obviously you need to have mpd and mpc installed and active ![]()
Addendum: it seems there is a bug in mpd/mpc for OpenWRT:
the "mpc add" command does not update the database file, so at the reboot you won't find any station to play, see below for a workaround, also the "volume" command of MPC does not work (they did a bad job!)
(Last edited by pilovis on 6 Sep 2016, 19:59)
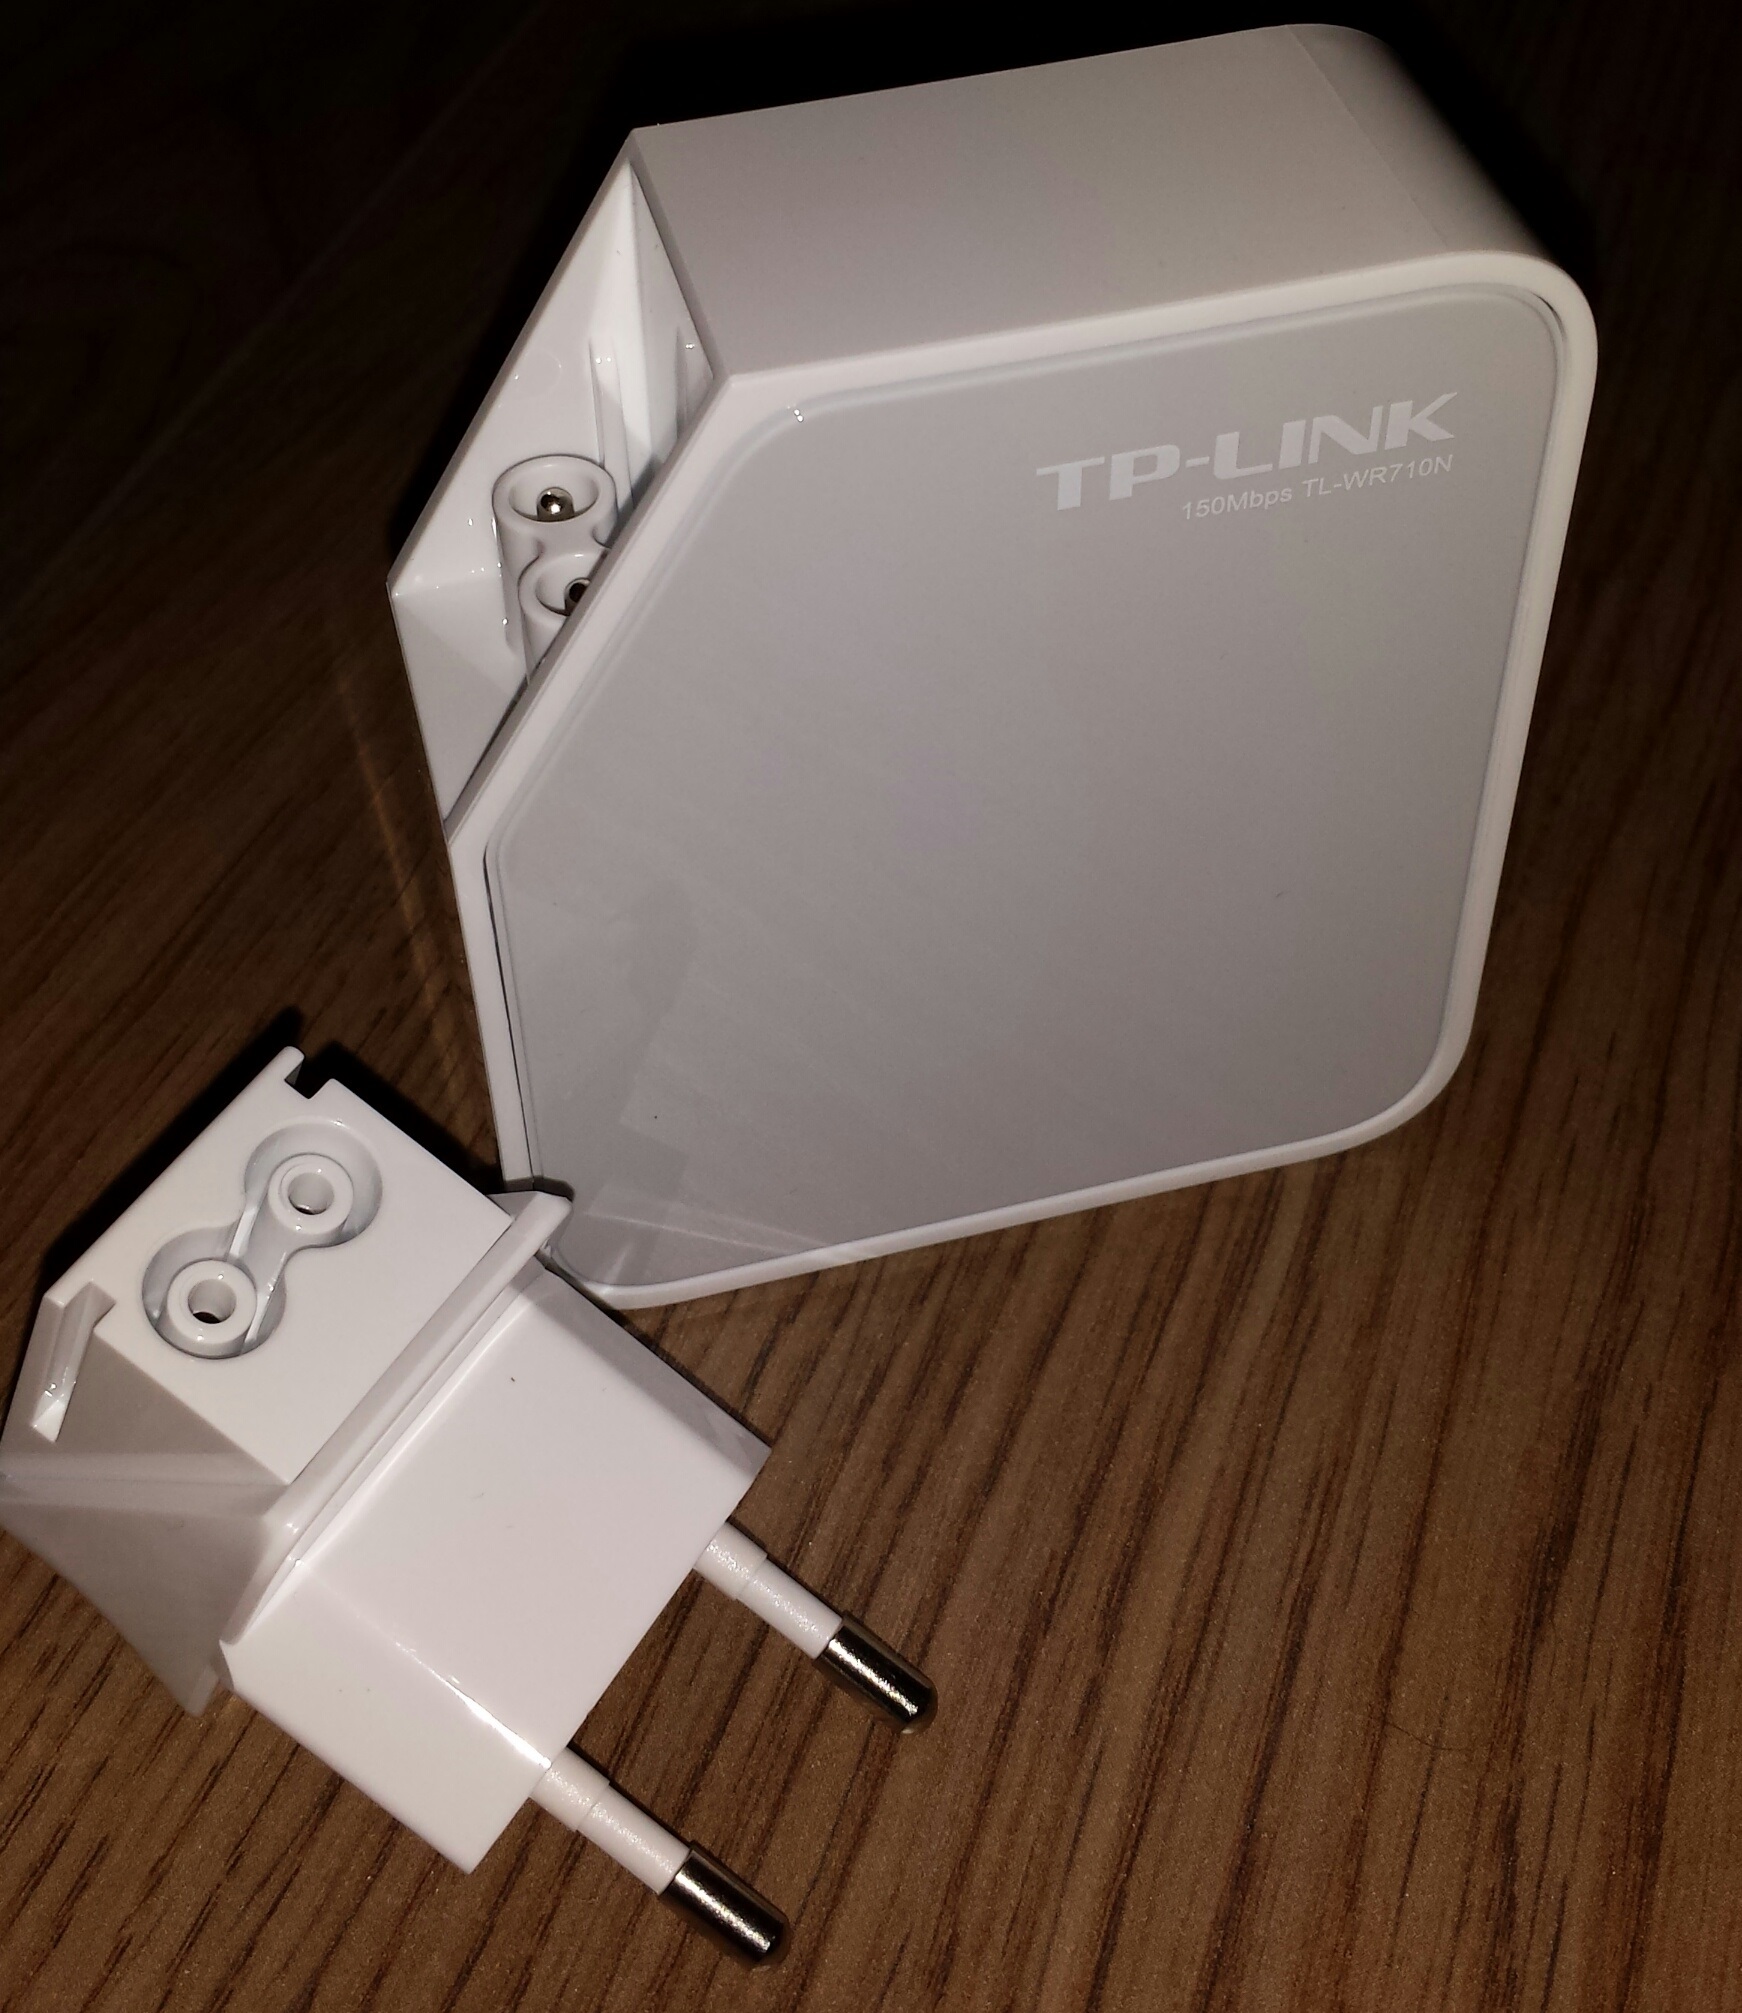
WiFi stereo Internet Digital Radio with embedded web interface, all in 8 Mbytes of Flash! ![]()
following the previous post, after some tries, I was finally able to install a fully Wi-FI Internet Radio Player into a cheap router with a single usb port, 32 Mbytes of ram and 8 Mbytes of Flash plus a cheap USB Audio card and ... nothing else ![]()
I choosed the TP-Link TL-WR710N router because of its integrated power supply, I don't want to have any power cord laying around!

These are the instructions to configure and install it on a TP-Link TL-WR710N Router:
Install Barrier Breaker 14.04 firmware for TL-WR710N router:
https://downloads.openwrt.org/barrier_b … actory.bin
configure your router as usual: system, ssh access, network, dhcp and WiFi (we'll keep these configurations),
test it but do not install any package.
Update the firmware with my custom firmware (see below) using Luci interface but do not forget to enable the option to keep settings! (current configuration files)
this is my custom firmware for TL-WR710N without luci, ppp and IPv6 to save precious space:
http://www.lovisolo.com/asterisk/softwa … pgrade.bin
(you may also use it for any other project, if you want to use a different router you need to build your custom specific firmware)
After the firmware update (a few minutes) the router reboots
then you can access it as usual (by ssh access because there is no more luci interface)
then give the following commands:
opkg update
opkg install kmod-sound-core
opkg install kmod-usb-audio
opkg install alsa-utils
opkg install mpd-mini
opkg install mpc
mkdir /root/music
mkdir /root/playlist
touch /root/mpd.db
edit mpd configuration file to match the following
vi /etc/mpd.conf
#
music_directory "/root//music"
playlist_directory "/root/playlist"
db_file "/root/mpd.db"
bind_to_address "0.0.0.0"
port "6600"
input {
plugin "curl"
}
audio_output {
type "oss"
name "My OSS Device"
device "/dev/dsp" # optional
}
audio_output_format "44100:16:2"
replaygain "auto"
volume_normalization "yes"
samplerate_converter "internal"
audio_buffer_size "6144"
buffer_before_play "40%"
# eof
Note: vi commands
"I" to edit file
press "Esc" and ":" and "wq" to save
launch mpd for the first time (ignore errors)
mpd
then reboot
reboot
Install PHP support
opkg update
opkg install php5 php5-cgi
Configure uhttpd web server for PHP
vi /etc/config/uhttpd
config uhttpd 'main'
list listen_http '0.0.0.0:80'
list listen_http '[::]:80'
list listen_https '0.0.0.0:443'
list listen_https '[::]:443'
option home '/www'
option rfc1918_filter '1'
option max_requests '3'
option max_connections '100'
option cert '/etc/uhttpd.crt'
option key '/etc/uhttpd.key'
option cgi_prefix '/cgi-bin'
option script_timeout '60'
option network_timeout '30'
option http_keepalive '20'
option tcp_keepalive '1'
option ubus_prefix '/ubus'
option config '/etc/httpd.conf'
option interpreter '.php=/usr/bin/php-cgi'
option index_page 'index.php index.html'
config cert 'px5g'
option days '730'
option bits '1024'
option country 'DE'
option state 'Berlin'
option location 'Berlin'
option commonname 'OpenWrt'
create working directory
mkdir /www/music
install and launch ftp server to load files form your pc to the router
opkg install vsftpd
/etc/init.d/vsftpd start
transfer with a ftp client (user = root) from your pc all the files you'll find inside the "www" directory of the following zip file:
http://www.lovisolo.com/asterisk/softwa … p3/www.zip
into the router "/www/music" directory
enable mpd to autostart at boot
/etc/init.d/mpd enable
then reboot
reboot
adding radio stations
To add internet radio stations use the following command:
mpc add (sreaming-url)
some stations to add:
mpc add http://144.76.106.52:7000/chillout.mp3
mpc add http://icestreaming.rai.it/4.mp3
mpc add http://205.164.62.15:9010/
mpc add http://streaming.radionomy.com/PassionLoveRadio
mpc add http://176.31.240.87:8025
mpc add http://stream.srg-ssr.ch/m/rsj/mp3_128
mpc add http://stream.srg-ssr.ch/m/rsc_it/mp3_128
mpc add http://stream.srg-ssr.ch/m/rsp/mp3_128
mpc add http://streaming.radionomy.com/CristalRelax
mpc add http://streaming.radionomy.com/Radio-Quelit
mpc add http://streaming.radionomy.com/GOLDEN-S … TIES-RADIO
mpc add http://streaming.radionomy.com/R-E-T-R-OF-M
mpc add http://streaming.radionomy.com/radio-accordeon
mpc add http://streaming.radionomy.com/100-HIT-ra
mpc add http://streaming.radionomy.com/colombiaromantica
mpc add http://streaming.radionomy.com/Ambiance-Reggae
mpc add http://streaming.hotmix-radio.net/hotmi … ge-128.mp3
mpc add http://streaming.radionomy.com/always-80s
mpc add http://streaming.radionomy.com/Hit-s-My-Music-Pop-Rock
mpc add http://streaming.radionomy.com/Cafe-Romantico-Radio
mpc add http://streaming.radionomy.com/1000-HITS-Sweet-Radio
mpc add http://46.37.20.205:8000/rdsmp3
ecc.
Addendum: it seems there is a bug in mpd/mpc for OpenWRT:
the "mpc add" command does not update the database file, so at the reboot you won't find any station to play, see below for a workaround
Enable "repeat mode"
mpc repeat on
Now you can access the web interface from http://ip-of-your-router/music
example: http://192.168.1.1/music
NOTE: this interface needs Chrome browser to be correctly displayed.
----------------------------------------------------------
Extra stuffs
To save anytime your current audio volume level, launch the following command:
/usr/sbin/alsactl -f /etc/alsa0.state store 0
and then to restore it on boot, insert the following line in "/etc/rc.local" file, right before the "exit 0" line
vi /etc/rc.local
/usr/sbin/alsactl -f /etc/alsa0.state restore 0
Basic Authentication on uhttpd
To add a password to uhttpd (web page access) to avoid that anyone can control your radio, use the following commands:
uci set uhttpd.main.config=/etc/httpd.conf
uci commit uhttpd
echo "/:user:password" > $(uci get uhttpd.main.config)
/etc/init.d/uhttpd restart
note: change user:password with your desidered user/password (for Web access)
-------------------------------------------------------------
Web interface as seen from an Android/iPhone smartphone:
NOTE: this interface needs Chrome browser to be correctly displayed.
Volume up and volume down MPD commands do not seem to work on Barrier Breaker, but work on Chaos Calmer.
----------------------------------------------------------------
*** Alternatively if you don't like or don't want to use this web control interface you can use any MPC client available for your device.
In that case disable web server to save precious RAM:
/etc/init.d/uhttpd disable
/etc/init.d/uhttpd stop
(Last edited by pilovis on 18 Jan 2018, 17:41)
To add internet radio stations use the following command:
mpc add (sreaming-url)some stations to add:
mpc add http://144.76.106.52:7000/chillout.mp3
mpc add http://icestreaming.rai.it/4.mp3
mpc add http://205.164.62.15:9010/
mpc add http://streaming.radionomy.com/PassionLoveRadio
mpc add http://176.31.240.87:8025
mpc add http://stream.srg-ssr.ch/m/rsj/mp3_128
mpc add http://stream.srg-ssr.ch/m/rsc_it/mp3_128
mpc add http://stream.srg-ssr.ch/m/rsp/mp3_128
mpc add http://streaming.radionomy.com/CristalRelax
mpc add http://streaming.radionomy.com/Radio-Quelit
mpc add http://streaming.radionomy.com/GOLDEN-S … TIES-RADIO
mpc add http://streaming.radionomy.com/R-E-T-R-OF-M
mpc add http://streaming.radionomy.com/radio-accordeon
mpc add http://streaming.radionomy.com/100-HIT-ra
mpc add http://streaming.radionomy.com/colombiaromantica
mpc add http://streaming.radionomy.com/Ambiance-Reggae
mpc add http://streaming.hotmix-radio.net/hotmi … ge-128.mp3
mpc add http://streaming.radionomy.com/always-80s
mpc add http://streaming.radionomy.com/Hit-s-My-Music-Pop-Rock
mpc add http://streaming.radionomy.com/Cafe-Romantico-Radio
mpc add http://streaming.radionomy.com/1000-HITS-Sweet-Radio
mpc add http://46.37.20.205:8000/rdsmp3
ecc.
It seems there is a bug in mpd/mpc for OpenWRT:
the "mpc add" command does not update the database file, so at the reboot you won't find any station to play ![]()
but I found a workaround ![]()
it is the following:
edit the "/etc/rc.local" file as the following:
vi /etc/rc.local
# Put your custom commands here that should be executed once
# the system init finished. By default this file does nothing.
#
# restore audio volume
/usr/sbin/alsactl -f /etc/alsa0.state restore 0
#
# add new URLs starting from here:
/usr/bin/mpc add http://144.76.106.52:7000/chillout.mp3
/usr/bin/mpc add http://icestreaming.rai.it/4.mp3
/usr/bin/mpc add http://205.164.62.15:9010/
/usr/bin/mpc add http://streaming.radionomy.com/PassionLoveRadio
/usr/bin/mpc add http://176.31.240.87:8025
/usr/bin/mpc add http://stream.srg-ssr.ch/m/rsj/mp3_128
/usr/bin/mpc add http://stream.srg-ssr.ch/m/rsc_it/mp3_128
/usr/bin/mpc add http://stream.srg-ssr.ch/m/rsp/mp3_128
/usr/bin/mpc add http://streaming.radionomy.com/CristalRelax
/usr/bin/mpc add http://streaming.radionomy.com/Radio-Quelit
/usr/bin/mpc add http://streaming.radionomy.com/GOLDEN-S … TIES-RADIO
/usr/bin/mpc add http://streaming.radionomy.com/R-E-T-R-OF-M
/usr/bin/mpc add http://streaming.radionomy.com/radio-accordeon
/usr/bin/mpc add http://streaming.radionomy.com/100-HIT-ra
/usr/bin/mpc add http://streaming.radionomy.com/colombiaromantica
/usr/bin/mpc add http://streaming.radionomy.com/Ambiance-Reggae
/usr/bin/mpc add http://streaming.hotmix-radio.net/hotmi … ge-128.mp3
/usr/bin/mpc add http://streaming.radionomy.com/always-80s
/usr/bin/mpc add http://streaming.radionomy.com/Hit-s-My-Music-Pop-Rock
/usr/bin/mpc add http://streaming.radionomy.com/Cafe-Romantico-Radio
/usr/bin/mpc add http://streaming.radionomy.com/1000-HITS-Sweet-Radio
/usr/bin/mpc add http://46.37.20.205:8000/rdsmp3
# do not remove or modify the two lines below
/usr/bin/mpc repeat on
exit 0
with this workaround, at the startup, the radio stations will be added to the MPD daemon.
(Last edited by pilovis on 22 Jul 2016, 20:17)
To use the led of the TL-WR710 as a WiFi indicator (wifi connection and network activity), this is the piece of configuration to put in the "/etc/config/system" file:
config led
option default '0'
option sysfs 'tp-link:blue:system'
option trigger 'netdev'
option dev 'wlan0'
option mode 'link tx rx'
option name 'WiFI
(Last edited by pilovis on 19 Jul 2016, 16:53)
I put this OpenWRT Digital Internet Radio inside an old and beautiful stereo radio receiver from 1964 (all with vacuum tubes).
The original FM section is defective (I'm able but too lazy to repair it) but the stereo amplifier is still superb with strong bass and brilliant high frequencies.
Now I have one of the very few (maybe the only one) "Vacuum Tubes WiFi Digital Stereo Internet Radio" ![]()


(Last edited by pilovis on 24 Jul 2016, 08:37)
addendum:
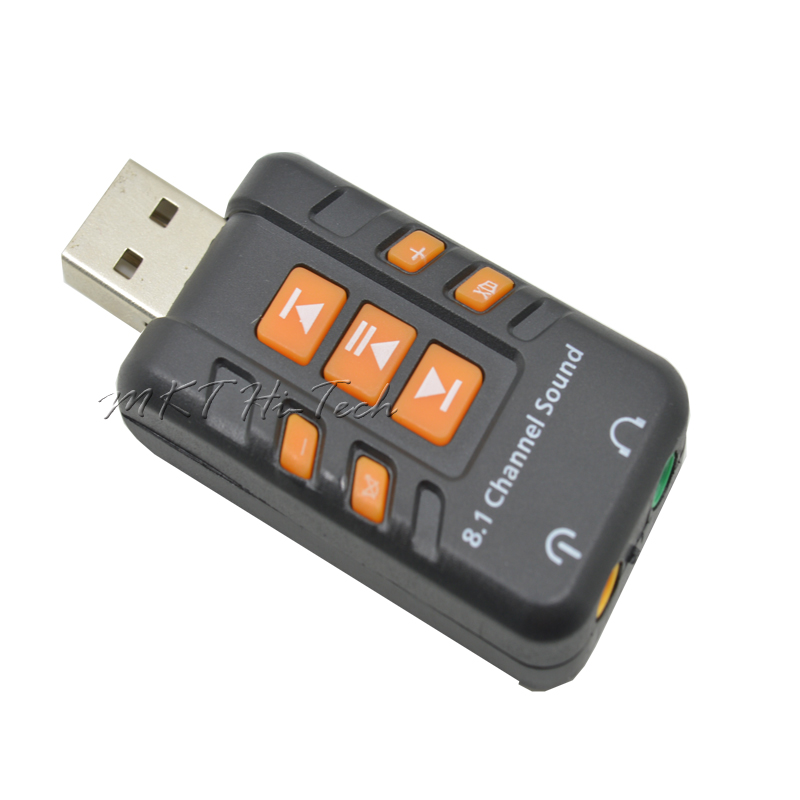
there is enough remaining space on the OpenWRT Radio described above to also install Triggerhappy to use the buttons (if any) on your USB audio device to control MPD: play, next radio station, prev radio station, volume up, volume down and mute.
Install triggerhappy:
opkg update
opkg install kmod-usb-hid
opkg install kmod-hid kmod-hid-generic
opkg install kmod-usb-uhci
opkg install kmod-button-hotplug
opkg install kmod-gpio-button-hotplug
opkg install kmod-usb-ohci
opkg install triggerhappy
edit the config file of triggerhappy "/etc/triggerhappy/triggers.d/example.conf":
vi /etc/triggerhappy/triggers.d/example.conf
#
# To view a list of supported event codes, use "thd --listevents" or
# "thd --dump /dev/input/event*"
#
# Format:
# <eventcode> <value> <command>
#
# values for key events are 1 (pressed), 0 (released) or 2 (held)
#
## control mpd
# start playing
KEY_PLAYPAUSE 1 /usr/bin/mpc play
# next station
KEY_NEXTSONG 1 /usr/bin/mpc next
# prev station
KEY_PREVIOUSSONG 1 /usr/bin/mpc prev
#
## control audio volume
# increase volume +2%:
KEY_VOLUMEUP 1 /usr/bin/amixer -q set Speaker 2%+
# set the volume at the minimum audible level (MUTE mode)
KEY_MIN_INTERESTING 1 amixer -q set Speaker 4
# decrease volume -2%:
KEY_VOLUMEDOWN 1 /usr/bin/amixer -q set Speaker 2%-
#
# Notes:
# "Speaker" may need to be changed to "PCM", it depends on your audio hardware,
# discover the right name by giving the command " alsamixer "
# also the name of the keys (KEY_xyxz) may need to be changed,
# discover their name by giving the following command: " thd --dump /dev/input/event* "
then enable triggerhappy to be launched at the startup:
/etc/init.d/triggerhappy enable
reboot and enjoy ![]()
-------------------------------------------------
This is the one i used:
(Last edited by pilovis on 7 Jan 2018, 17:14)
... and some tweakings to improve radio functionality.
32 Megabytes of Ram are just the bare minimum for this internet radio to run, every extra kilobyte available is important.
Here are some tips to stop some useless (for this application) services to save some RAM and CPU usage:
Stop ntpd service by editing "/etc/config/system" and disable it:
config timeserver 'ntp'
option enabled '0'
Disable console on serial port (UART) by editing "/etc/inittab" and comment out the line like the following:
#::askconsole:/bin/ash --login
edit "/etc/php.ini" and change the memory limit = 8 Mbytes to 4 Mbytes
Disable logging:
/etc/init.d/log disable
Disable sysfixtime:
/etc/init.d/sysfixtime disable
Disable dnsmasq:
/etc/init.d/dnsmasq disable
Disable cron (if you don't plan to use it)
/etc/init.d/cron disable
then reboot to apply.
Now if you run the top command you should see something like this:
Mem: 26016K used, 2844K free, 0K shrd, 468K buff, 2172K cached
CPU: 19% usr 4% sys 0% nic 75% idle 0% io 0% irq 0% sirq
Load average: 0.23 0.22 0.11 1/37 1547
PID PPID USER STAT VSZ %VSZ %CPU COMMAND
990 1 root S 20976 73% 21% /usr/bin/mpd
945 1 root S 1552 5% 2% /usr/sbin/wpa_supplicant -B -P /var/r
1449 1284 root R 1364 5% 1% top
6 2 root SW 0 0% 0% [kworker/u2:0]
341 2 root SW 0 0% 0% [kworker/u2:2]
678 1 root S 1544 5% 0% /sbin/netifd
786 1 root S 1512 5% 0% /usr/sbin/uhttpd -f -h /www -r OpenWr
1 0 root S 1388 5% 0% /sbin/procd
1284 1274 root S 1364 5% 0% -ash
1134 678 root S 1360 5% 0% udhcpc -p /var/run/udhcpc-eth0.pid -s
1274 732 root S 1220 4% 0% /usr/sbin/dropbear -F -P /var/run/dro
732 1 root S 1152 4% 0% /usr/sbin/dropbear -F -P /var/run/dro
464 1 root S 884 3% 0% /sbin/ubusd
996 1 root S 804 3% 0% /usr/sbin/thd --socket /tmp/triggerha
8 2 root SW 0 0% 0% [kworker/u2:1]
4 2 root SW 0 0% 0% [kworker/0:0]
257 2 root SW 0 0% 0% [kworker/0:2]
338 2 root SWN 0 0% 0% [jffs2_gcd_mtd3]
3 2 root SW 0 0% 0% [ksoftirqd/0]
97 2 root SW 0 0% 0% [kswapd0]
Without the "top" process we have just 3 megabytes of Ram available, not too much but enough ![]()
If you want to use a MPD client instead of the integrated web page, disable uhttpd (/etc/init.d/uhttpd disable), this will save other 2 megabytes of Ram.
(Last edited by pilovis on 18 Jan 2018, 17:42)
Hello Pilovis
Glad to see that you returned to this project. I have a mr3220 that i could use to setup a new reciever.
I think it is the same installation like in first page with 14.04, and also i would use usb Hub to use an external drive to increase space for installation.
What aboout of ram i n this Router, seems to be 4mb only too?
Hello Pilovis
Glad to see that you returned to this project. I have a mr3220 that i could use to setup a new reciever.I think it is the same installation like in first page with 14.04, and also i would use usb Hub to use an external drive to increase space for installation.
What aboout of ram i n this Router, seems to be 4mb only too?
Yes, this is an Energy Saving (Max 5 W) and Mini-version of the Internet Radio you see on the first page of this thread, the only difference is that this one fits on just 8 Megabytes of Flash and doesn't need anything else that a mini USB audio adapter (or a USB headset), I also added an embedded web server to let you remotely control the radio by a browser and also to see what station and song it is currently playing.
The usb audio adapter can be fitted into the router case with a little hardware hacking.
The RAM of mr3220 is 32 Mbytes, that's OK.
The Flash is only 4 Mbytes, but If you install external USB Overlay to increase flash space, I think there won't be any problem to install this internet radio.
Eventually, install and enable a Swap space on the external USB drive (64 Mbytes will be enough), this will improve performances in terms of speed of controlling and changing radio stations.
(Last edited by pilovis on 21 Jul 2016, 14:46)
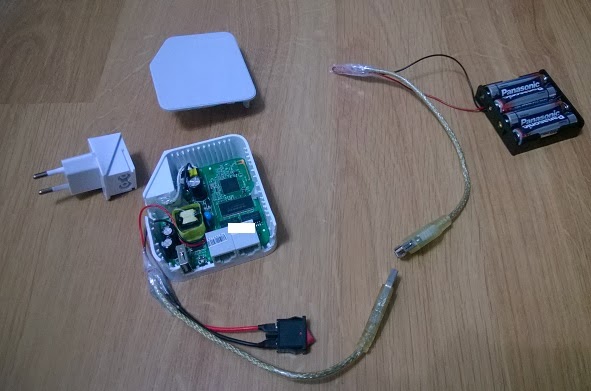
By using a USB headset instead of the USB audio adapter, and four AAA rechargeable batteries or a small 5v power bank (to be connected inside the router) you can use this as a portable WiFi Digital Internet Radio ![]()
[the main power socket of this router is detachable]
When connected to the main supply voltage the batteries or power bank are recharged (a recharging circuit is needed).
You may also use a traditional stereo headset (3.5 mm jack), but in this case you have to use the USB audio adapter, it might be fitted inside the router case as well.
It could be also solar powered since the total power consumption is no more than 1W for the router itself and about 1W for the USB audio interface.
(Last edited by pilovis on 26 Jul 2016, 14:31)
I've just created a very simple and light web page to let control the radio by Firefox browser without using PHP (too much memory comsumption).
The page is configured to be easily used by a smartphone bowser, there are no frills, just the bare essentials ![]()
The audio volume control is not implemented yet, mostly because the "mpc volume" command does not function in this Openwrt version ![]() , anyway you can use other solutions to control the audio volume by a cgi script (eg. /usr/bin/amixer -q set device value)
, anyway you can use other solutions to control the audio volume by a cgi script (eg. /usr/bin/amixer -q set device value)
The idea is to use cgi.
This is just an example of the /www/cgi-bin/play.cgi script:
#!/bin/ash
/usr/bin/mpc play > /dev/null 2>&1
/bin/echo ""
/bin/echo '<FORM><INPUT Type="button" VALUE="buffering ... press to go back" onClick="history.go(-1);return true;" style="font-family: sans-serif; font-size: 60px;"></FORM>'
in the others scripts (called by the index.html) just change the mpc command: next, prev, stop, ecc
this is the /www/index.html example:
<html>
<head>
<title>Internet digital radio</title>
</head>
<body>
<meta http-equiv="refresh" content="5" >
<p>
<iframe
style="background: #AAFFFF"
src ="/cgi-bin/test.cgi"
width="640px"
height="80px">
</iframe>
<hr>
<FORM ACTION="/cgi-bin/next.cgi">
<INPUT TYPE=SUBMIT VALUE="Next >>" style="font-family: sans-serif; font-size: 90px;">
</FORM>
<FORM ACTION="/cgi-bin/play.cgi">
<INPUT TYPE=SUBMIT VALUE="Play >" style="font-family: sans-serif; font-size: 90px;">
</FORM>
<FORM ACTION="/cgi-bin/stop.cgi">
<INPUT TYPE=SUBMIT VALUE="Stop || " style="font-family: sans-serif; font-size: 90px;">
</FORM>
<FORM ACTION="/cgi-bin/prev.cgi">
<INPUT TYPE=SUBMIT VALUE="Prev <<" style="font-family: sans-serif; font-size: 90px;">
</FORM>
<hr>
by P.M. Lovisolo 2016 - parknat12@yahoo.com
</body>
</html>
This is the /www/cgi-bin/test.cgi called by index.html to display into the <iframe> the current song and other system informations:
#!/bin/ash
#
#now=$(date)
/bin/echo ''
#/bin/echo $now
cpu=$(grep 'cpu ' /proc/stat | awk '{usage=($2+$4)*100/($2+$4+$5)} END {print usage "%"}')
uptime=$(/usr/bin/uptime)
/bin/echo 'Uptime:' $uptime
/bin/echo "CPU usage:" $cpu
/bin/echo '---------------------------------------------------------------------------------'
song=$(/usr/bin/mpc current)
/bin/echo "Now playing:" $song
# eof
Note: don't forget to give "chmod 755" permisisons to all cgi scripts!
(Last edited by pilovis on 22 Jul 2016, 19:17)
... a simple page to edit (add, modify or remove) the radio stations URLs (as per my workaround above) directly from the browser, it uses PHP but it consumes only a few kilobytes of RAM:
vi /www/addurl.php
<?php
// configuration
$url = 'addurl.php';
$file = '/etc/rc.local';
// check if form has been submitted
if (isset($_POST['text']))
{
// save the text contents
file_put_contents($file, $_POST['text']);
// redirect to form again
header(sprintf('Location: %s', $url));
printf('<a href="%s">Moved</a>.', htmlspecialchars($url));
exit();
}
// read the textfile
$text = file_get_contents($file);
?>
<body bgcolor="#84b0fd" text="#030303" link="#9abcde">
This form permits you to add/modify/remove radio stations to MPD,
<br>
don't forget to insert <b>"/usr/bin/mpc add "</b> before the streaming URL.
<br>
<b></b>
<p>
<i>Note: do not remove the "exit 0" line!</i>
<p>
<!-- HTML form -->
<form action="" method="post">
<textarea rows="22" cols="80" name="text">
<?php echo htmlspecialchars($text) ?></textarea>
<br>
<input type="submit" />
<input type="reset" />
<p>
<td>
<table border="0" cellspacing="0" cellpadding="3" width="100%" bgcolor="#ffffff" align="center">
<td bgcolor="#000000" align="left">
<a href="index.html">Return to the radio control page</a></td>
</td>
</form>
then add a link to this page into the index.html file by adding the following code at the end of the file just before </body> line:
<td>
<table border="0" cellspacing="0" cellpadding="3" width="100%" bgcolor="#ffffff" align="center">
<td bgcolor="#FFFFFF" align="left">
<a href="addurl.php">Click here to add new radio stations</a></td>
</td>
</form>
or else:
<hr>
<button onclick="location.href = 'addurl.php';" id="myButton" class="float-left submit-button" >click here to add new Radio Stations</button>
(Last edited by pilovis on 22 Jul 2016, 20:36)
in case something went wrong (eg. you have mistakenly edited some configuration file) and you cannot connect to your router, to gain access to it follow this procedure:
Disconnect WAN cable
Unplug power to router
Set your computers IP address to:
IPv4 Address: 192.168.1.2
Netmask: 255.255.255.0
Gateway: 192.168.1.1
Re-power your router, press the ‘reset’ button as soon as the led start blinking, then when you release the reset button the led should start blinking much faster.
Using PuTTY (or your favourite *TELNET* client), connect to 192.168.1.1 and you should see the OpenWrt prompt. Type the command below (in red):
-----------------------------------------------------
root@(none):/# mount_root
jffs2 is ready
jffs2 is ready
switching to overlay
then you can edit any file on your router:
vi /etc/file...
when done, save and reboot.
In case you want to inizialize openwrt to default and remove all configurations and all files you have added/modified, give instead the following commands:
mount_root
mtd -r erase rootfs_data
reboot -f
(Last edited by pilovis on 6 Sep 2016, 20:05)
I will regularly post here more radio station URis to be added to the Internet Radio:
http://89.16.185.174:8003/stream
http://89.16.185.174:8000/stream
http://89.16.185.174:8004/stream
http://streaming.radionomy.com/Fm-Tropical-Shad-972
http://streaming.radionomy.com/NashvilleEdge
http://streaming.radionomy.com/Abacusfm-Nature
http://streaming.radionomy.com/chd--radio-country
http://streaming.radionomy.com/1-Radio-Dance
http://streaming.radionomy.com/Acoustic-FM
http://streaming.radionomy.com/ABC-Love
http://streaming.radionomy.com/Radio-Nostalgia
http://andromeda.shoutca.st:8634/stream
http://streaming.radionomy.com/Tsjechische-Blaasmuziek
http://streaming.radionomy.com/DanceRO
http://streaming.radionomy.com/BobFamilyandfriends
http://streaming.radionomy.com/radio-ol … k--n--roll
http://streaming.radionomy.com/The-Buffalo
http://streaming.radionomy.com/VWClassicRock
http://icecast2.rte.ie/ieradio1
http://listen.radionomy.com/the-smooth-lounge
http://hr-mp3-m-h3.akacast.akamaistream … r-mp3-m-h3
(Last edited by pilovis on 26 Jul 2016, 20:32)
thanks!
Once you have configured everything and tested that the internet radio works well, , to get the best performances you can disable "dropbear" to gain another megabytes of free ram, but the downside is that you won't be able to access the router anymore (ssh access).
Anyway, if you choose to disable dropbear you can eventually gain access to the router following the procedure above.
To disable dropbear give the following command and then reboot:
/etc/init.d/dropbear disable
(Last edited by pilovis on 2 Aug 2016, 13:37)
Enabling Wifi 2.4 Ghz channel 12 and 13 on ar71xx (TL-WR710N, TL-WDR3600/4300. etc.), enable all channels from 36 to 165 on 5 GHz (TL-WDR3600/4300), and higher power on both bands.
There is a law in the US or an FCC regulation that requires all Wifi devices shipped to determine on the hardware level (in this case, in the driver) whether the desired frequency and power level is allowed.
Unfortunately, TP-Link simply sets the bit to US mode on all devices shipped worldwide. The stock firmware ignores it and offers frequency and power choice based on the selected country code. OpenWRT however (as would a stock Linux kernel) respects the bit and applies a logic AND over the selected regulatory domain and the US regulatory domain.
Luckily, someone created a binary patch called reghack that replaces the in-driver US regulations with unrestricted ones. ![]()
All informations here: http://blog.michael.kuron-germany.de/20 … nt-page-1/
The reghack utility (tested on Barrier Breaker and Chaos Calmer for TL-WR710N and TL-WDR3600/TL-WDR4300, it does not work on A.A. firmware) replaces the regulatory domain rules in the driver binaries with less restrictive ones. The current version also lifts the 5GHz radar
channel restrictions in ath9k.
- basically:
cd /tmp/
wget http://luci.subsignal.org/~jow/reghack/reghack.mips.elf
chmod +x reghack.mips.elf
./reghack.mips.elf /lib/modules/*/ath.ko
./reghack.mips.elf /lib/modules/*/cfg80211.ko
reboot
before on TL-WR710N and TL-WDR3600:
iw phy phy0 info
* 2412 MHz [1] (30.0 dBm)
* 2417 MHz [2] (30.0 dBm)
* 2422 MHz [3] (30.0 dBm)
* 2427 MHz [4] (30.0 dBm)
* 2432 MHz [5] (30.0 dBm)
* 2437 MHz [6] (30.0 dBm)
* 2442 MHz [7] (30.0 dBm)
* 2447 MHz [8] (30.0 dBm)
* 2452 MHz [9] (30.0 dBm)
* 2457 MHz [10] (30.0 dBm)
* 2462 MHz [11] (30.0 dBm)
* 2467 MHz [12] (disabled)
* 2472 MHz [13] (disabled)
* 2484 MHz [14] (disabled)
After applying the patch:
iw phy phy0 info
Frequencies:
* 2412 MHz [1] (30.0 dBm)
* 2417 MHz [2] (30.0 dBm)
* 2422 MHz [3] (30.0 dBm)
* 2427 MHz [4] (30.0 dBm)
* 2432 MHz [5] (30.0 dBm)
* 2437 MHz [6] (30.0 dBm)
* 2442 MHz [7] (30.0 dBm)
* 2447 MHz [8] (30.0 dBm)
* 2452 MHz [9] (30.0 dBm)
* 2457 MHz [10] (30.0 dBm)
* 2462 MHz [11] (30.0 dBm)
* 2467 MHz [12] (30.0 dBm)
* 2472 MHz [13] (30.0 dBm)
* 2484 MHz [14] (disabled)
Note: to check the 5 Ghz channels on TL-WDR3600 use the following command:
iw phy phy1 info
After applying the patch on TL-WDR3600:
Frequencies:
* 5180 MHz [36] (30.0 dBm)
* 5200 MHz [40] (30.0 dBm)
* 5220 MHz [44] (30.0 dBm)
* 5240 MHz [48] (30.0 dBm)
* 5260 MHz [52] (30.0 dBm)
* 5280 MHz [56] (30.0 dBm)
* 5300 MHz [60] (30.0 dBm)
* 5320 MHz [64] (30.0 dBm)
* 5500 MHz [100] (30.0 dBm)
* 5520 MHz [104] (30.0 dBm)
* 5540 MHz [108] (30.0 dBm)
* 5560 MHz [112] (30.0 dBm)
* 5580 MHz [116] (30.0 dBm)
* 5600 MHz [120] (30.0 dBm)
* 5620 MHz [124] (30.0 dBm)
* 5640 MHz [128] (30.0 dBm)
* 5660 MHz [132] (30.0 dBm)
* 5680 MHz [136] (30.0 dBm)
* 5700 MHz [140] (30.0 dBm)
* 5745 MHz [149] (30.0 dBm)
* 5765 MHz [153] (30.0 dBm)
* 5785 MHz [157] (30.0 dBm)
* 5805 MHz [161] (30.0 dBm)
* 5825 MHz [165] (30.0 dBm)
Note: TP-Link saved a few cents on the 2.4 and 5 GHz power amplifier, which doesn’t even do more than 100 mW ( 20 dBm) on 2.4 Ghz and 63 mW (18 dBm) on 5 Ghz.
Warning: Before you change channels and transmission power on your Wifi devices, check with the regulation authority what is legally allowed in your location. The hardware is capable of things that can interfere with radar etc. and you should never set it to a country code other than your current location. Even then, you might be able to choose options that are not legal to operate.
-------------------------------------------------------------------------------------------------------
Almost all countries defines power limitations for Wi-Fi devices (EIRP max).
The key to applying these rules is to understand EIRP (Equivalent Isotropically Radiated Power), which represents the total effective transmit power of the radio, including gains that the antenna provides (and losses from the antenna cable and connectors).
The EIRP is calculated using this formula:
EIRP = Effective Isotropic Radiated Power
Pout = transmitter power output (dBm)
Ct = signal loss in cable (dB)
Gt = gain of the antenna (dBi)
Pout - Ct + Gt = EIRP
When installing a wireless system with external (or internal) antenna, your EIRP calculation should not exceed the class license limit. Other wise you must adjust either the transmitter power output, the length of cable and/or the choice of antenna.
You may find the gain of a router antenna in the specification manual, this value generally includes signal loss in cable (the cable from the router board to the antenna).
The RP-SMA antenna connector (female+male) present in many routers, also has a little signal loss, but you can ignore it in the EIRP calculation.
Generally the internal antenna gain (antenna printed on PCB) of a router like the TL-WR710N is about 2 dBi.
The TL-WDR3600 has two external antennas with 2 dBi @ 2.4 Ghz and 3 dBi @ 5 Ghz gain each.
The small external antennas of many router, like D-Link 600, have 2 dBi gain,
just a few high power routers have 4-5 dBi antennas.
Most of the time you get better results (coverage and signal improvements) by increasing the gain of the antenna than increasing the output power, more power means also more EMF noise and disturbances.
(Last edited by pilovis on 27 Dec 2017, 20:53)
Hi Pilovis,
I am looking for some help with a project, and I do not know hoe to contact you privately. I've created a WiFi sensor with a Raspberry pi, and I would like to do it with a more stable product (and cheaper).
My goal is to use a TP-Link TL-WR710N as WiFi sniffer, and to use a WiFi dongle connected to the USB (such as TP-LINK TL-WN725N) to connect the device to the internet.
Would you be interested on doing something like this?
If so, please contact me somehow (you do not have twitter or facebook, so I left my Skype on my profile. If you want any other info, please tell me.
I am creating a start-up at the moment, so I do not have a lot of ressources, but (of course) I would pay yoy for your help.
Thanks!
My email is parknat12@yahoo.com ![]()