OpenWrt Forum Archive

Topic: [How To] Home Automation - Relay Board controlled from Web page or SMS

The content of this topic has been archived between 17 Apr 2018 and 5 May 2018. There are no obvious gaps in this topic, but there may still be some posts missing at the end.

Check also my other How To's:

[How To] Openwrt + Asterisk11 + GSM/SMS channel (chan_dongle):
https://forum.openwrt.org/viewtopic.php … 90#p253590

and

[HowTo] Openwrt cheap Digital Stereo WiFi Internet Radio & MP3 Player:
https://forum.openwrt.org/viewtopic.php … 63#p225463

and
[How To] Web SMS server with OpenWRT:
https://forum.openwrt.org/viewtopic.php?id=60910

-----------------------------------------------------------------------------------------

Quick and Mini How-to:

"OpenWRT - Controlling leds and a simple 5V relay board via Web interface"
on TP-Link TL-WR741nd with OpenWRT Backfire
.

http://wiki.openwrt.org/toh/tp-link/tl-wr741nd

https://fbcdn-sphotos-b-a.akamaihd.net/hphotos-ak-xfp1/v/t1.0-9/10425149_883059205040493_4569737742625033521_n.jpg?oh=99c7a37b37405a502f85b95b4e106f74&oe=553F0304&__gda__=1430263693_4ad5c3e55499555b9640b57b2682d89c

First, check you have the following kernel module and sofware installed:
opkg update
opkg install kmod-leds-gpio
opkg install kmod-ledtrig-gpio kmod-ledtrig-default-on
opkg install mini-sendmail


Led commands (example for "SYS" led = "DS1" on PCB)
---------------------------------------------------   

led green:system (1= led on - 0= led off):

   /bin/echo 1 > /sys/devices/platform/leds-gpio/leds/tl-wr741nd:green:system/brightness
   /bin/echo 0 > /sys/devices/platform/leds-gpio/leds/tl-wr741nd:green:system/brightness


Check led state
---------------------

  cat /sys/devices/platform/leds-gpio/leds/tl-wr741nd:green:system/brightness 


Note: the other available Led on this router is QSS : tl-wr741nd:green:qss


-------------------------------------

Startup settings,  edit /etc/rc.local:

/bin/echo none > /sys/devices/platform/leds-gpio/leds/tl-wr741nd:green:system/trigger
/bin/echo 1 > /sys/devices/platform/leds-gpio/leds/tl-wr741nd:green:system/brightness
exit 0

note: set default led status = off

--------
cgi-bin
--------

- edit /www/cgi-bin/on.cgi:

#!/bin/ash
echo 'ON'
/bin/sh /root/on
cat /www/cgi-bin/enabled.txt | mini_sendmail -fsender@domain.com -ssmtp.domain.com -p25 user@domain.com

note: switch on relay board and than send activation notification by email

- edit /www/cgi-bin/off.cgi:

#!/bin/ash
echo 'OFF'
/bin/sh /root/off
cat /www/cgi-bin/disabled.txt | mini_sendmail -fsender@domain.com -ssmtp.domain.com -p25 user@domain.com

note: switch ff relay board and than send deactivation notification by email


- edit /www/cgi-bin/test.cgi:

#!/bin/ash
echo '0 = Activated, 1 = Deactivated'
echo ' '
/bin/cat /sys/devices/platform/leds-gpio/leds/tl-wr741nd:green:system/brightness

note: show cannels status on screen (web page)


- edit /www/cgi-bin/enabled.txt:
   
subject: Activated!


- edit /www/cgi-bin/disabled.txt:

subject: Deactivated!


---------
Scripts:
---------

- edit /root/on:


/bin/echo 0 > /sys/devices/platform/leds-gpio/leds/tl-wr741nd:green:system/brightness


- edit /root/off:


/bin/echo 1 > /sys/devices/platform/leds-gpio/leds/tl-wr741nd:green:system/brightness


-----------------------------------------------
Important Notes:

- All cgi and scripts need "chmod 777"
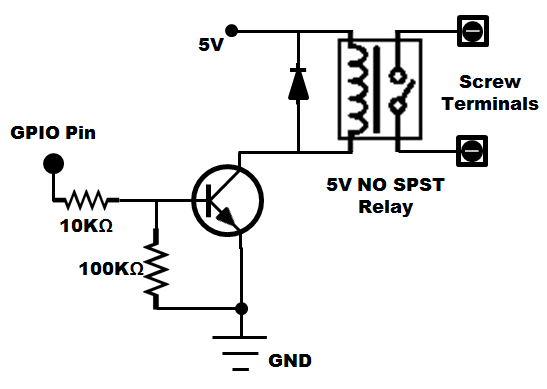
- The signal from led catode is inverted: when the led is OFF the signal voltage is high = relay ON , when the led is ON the signal voltage is low = relay OFF
- The router starts blinking all leds on the startup sequence for several seconds, to avoid the relay board triggering on and off during router bootup, you need to (hardware) delay the activation of the relay boards until the router is fully booted, you may use a NE555 timer or better add a digital/relay logic to wait til the router is fully up.
-----------------------------------------------


Web control panel (basic example)
-----------------------------------------

give the following comand:
mv index.html luci.html

-edit /www/index.html:

------------------------------------------------
<br>
CENTRALINA DI COMANDO
<br>
------------------------------------------------
<p>
<FORM ACTION="/cgi-bin/off.cgi">
<INPUT TYPE=SUBMIT VALUE="Switch off">
</FORM>
<FORM ACTION="/cgi-bin/on.cgi">
<INPUT TYPE=SUBMIT VALUE="Switch on">
</FORM>
<p>
------------------------------------------------
<br>
STATUS CHECK
<br>
------------------------------------------------
<p>
<FORM ACTION="/cgi-bin/test.cgi">
<INPUT TYPE=SUBMIT VALUE="check status">
</FORM>

<p>
------------------------------------------------
<form action="luci.html">
<input type="submit" value="Luci control panel">
</form>
<p>
------------------------------------------------
<p> by P.M. Lovisolo 2014


-----------------------------------------

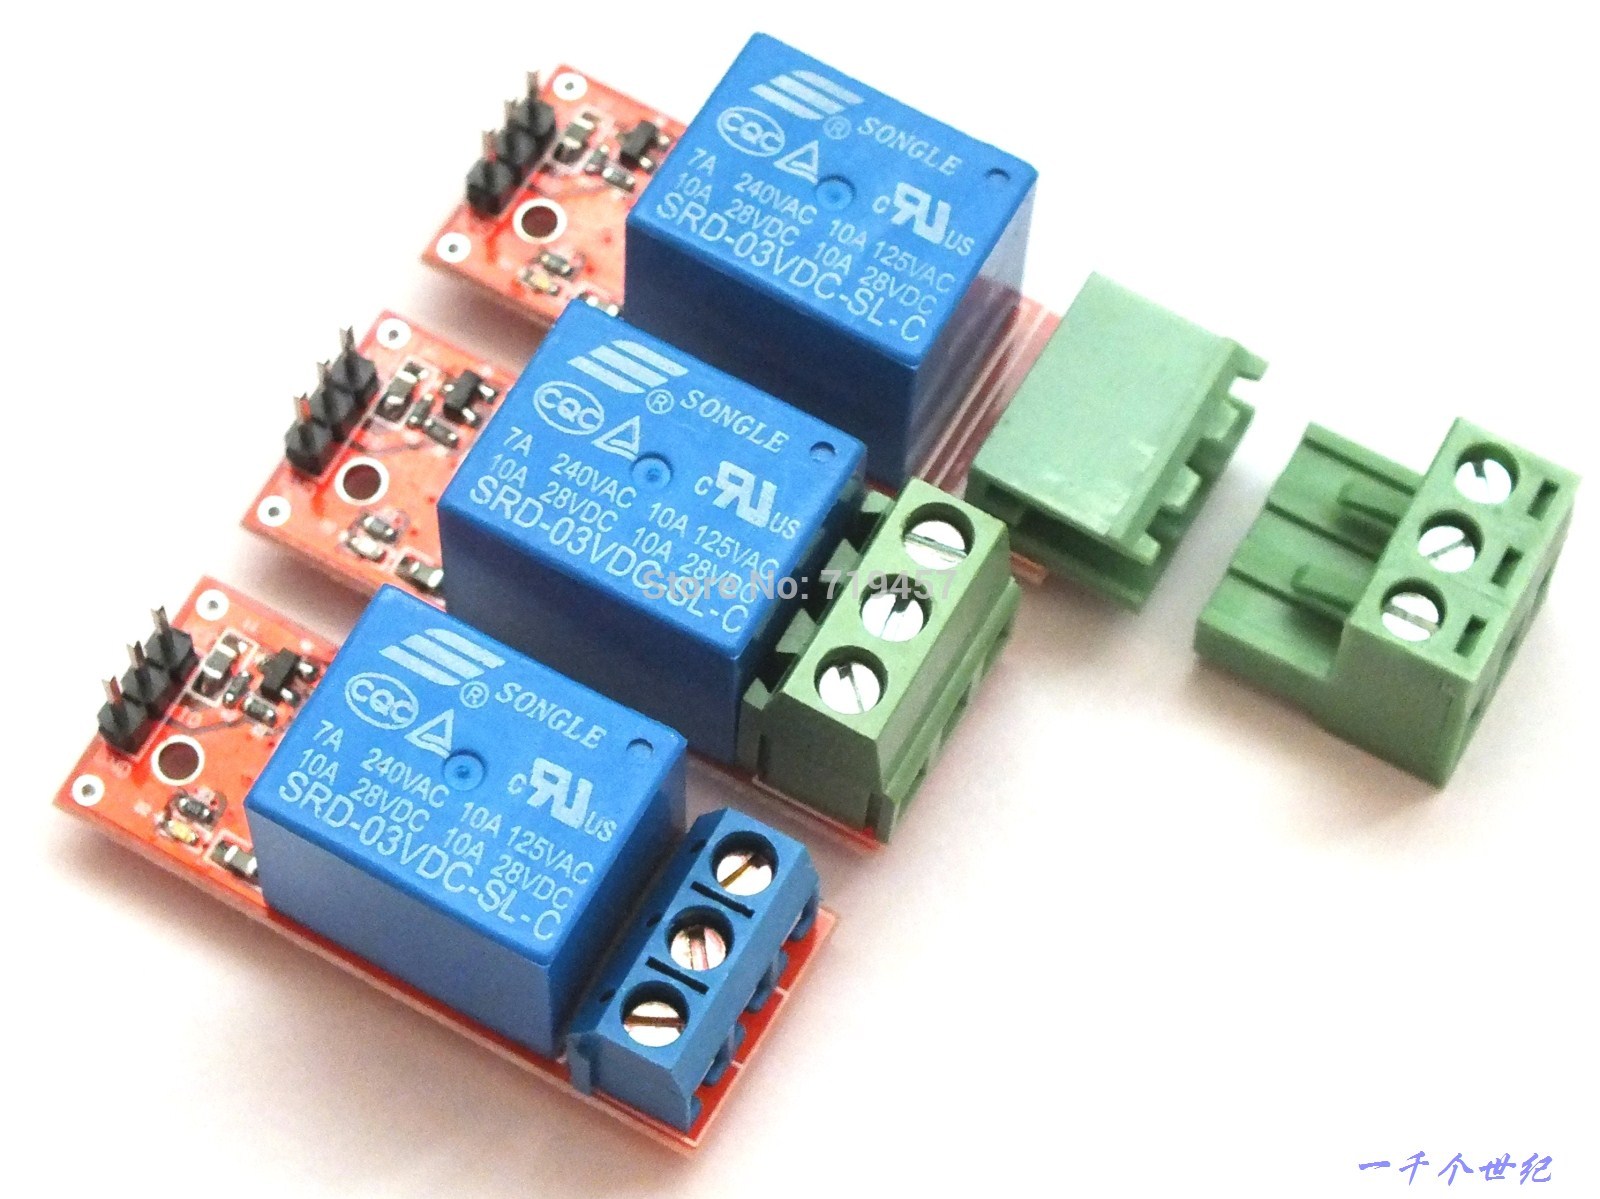
GPIO pin (3V) = Led Catode of DS1 (Sys led) close to C382, opposite to "+" label
Transistor = 2n2222 or equivalent
Diode=1n4004 or equivalent
Resistors = 1/4W 5 or 10%

Note: you may add a red led with a 1Kohm drop resistor in parallel to the relay coil.

http://2.bp.blogspot.com/-L-UOlMsomPw/UGrXD5zr2iI/AAAAAAAAAJU/AgIuzHv97ZM/s1600/Relay-revised.gif

Be very careful when soldering!
After the soldering process, block the connection wires to the PCB with a drop of glue to prevent pulling fragile pads away from router pcb!

----------------------------------------------------------------------
GPIOs are commonly used in router devices for buttons or leds. They only safely supply or sink (pull to GND) a maximum of 4mA aprox., and the voltage is usually 3V when active. Only two states are possible: high or low. Depending on how a device is activated by a GPIO, active low or active high is defined.

    active high: the device is activated when the GPIO is HIGH
    active low: the device is activated when the GPIO is LOW

Depending on your router model you may have the following configurations:

http://wiki.openwrt.org/_media/media/gpios-high_low.png

NOTES:

If you have installed OpenWrt on your router the leds should be controlled by the leds_gpio kernel module. Every led will have an entry in sysfs under /sys/class/leds

To manually control a led you should first set the trigger file to none, otherwise the led will be controlled for its original function, i.e. ethernet activity indicator:
echo none > trigger
Then you can set the value by writing to the brightness file. This file represents the brightness level which should range from 0 to the value contained in the max_brightness file. However, in most cases there will not be hardware brightness control for the leds (like with GPIO), so 0 will turn OFF the led and any non-zero value will turn it ON:
echo 0 > brightness
echo 1 > brightness

(Last edited by pilovis on 13 Nov 2015, 13:24)

Great project!

If you use a Router with USB interface you can add SMS control functionality to the relay board using Gnokii.

Simply send a SMS to activate or deactivate a led (relay board).

Note: thanks to: http://www.nabuk.org/f/index.php?topic=2864.0

example of SMS command script for Huawei E169 USB 3G dongle and TP-Link TL-MR3020 router (Attitude Adjustment):

opkg update
opkg install luci-proto-3g
opkg install kmod-usb-core
opkg install kmod-usb-uhci
opkg install kmod-usb-ohci
opkg install kmod-usb2
opkg install usbutils
opkg install libusb usb-modeswitch usb-modeswitch-data kmod-usb-serial kmod-usb-serial-option kmod-usb-serial-wwan
opkg install gnokii
mkdir /root/sms

Now plug the USB 3G dongle and restart the router, than check with dmesg that you see 3 lines like this:
usb 1-1: GSM modem (1-port) converter now attached to ttyUSBx

if so, edit /root/getsms.sh:

####################################
# TP-Link TL-MR3020 + Huawei E 169 3G dongle + Gnokii
# OpenWRT Attitude Adjustment
#
# GetSMS - controlla la presenza di
# nuovi SMS sulla periferica e se
# riconosce dei comandi esegue delle
# operazioni.
#
#SMS#
#Send
On text to switch on the relay
#Send 
Off text to switch off the relay
####################################

# Variabili
folder=/root/sms    # Cartella di destinazione
newsms=$folder/newsms    # Nuovi SMS
dbsms=$folder/dbsms    # Database SMS
newcmd=$folder/newcmd    # Nuovi comandi
dbcmd=$folder/dbcmd    # Database comandi

numsms=3        # Numero di SMS da leggere

# Riempie il file newsms
gnokii --getsms ME 0 $numsms -d > $newsms

# Riempie il file newcmd
grep Text -A1 $newsms | grep -v "Text\|--" > $newcmd

# Conta i comandi
numcmd=$(grep -c "^" $newcmd)

# Se non ci sono nuovi comandi non prosegue
if [ $numcmd -eq 0 ]
then
    exit 1
fi

# Analizza i comandi
for ancmd in $(cat $newcmd)
do
    case $ancmd
    in
        On) echo 0 > /sys/devices/platform/leds-gpio/leds/tp-link:green:3g/brightness            # canale ON
        echo $ancmd >> $dbcmd;;
        Off) echo 1 > /sys/devices/platform/leds-gpio/leds/tp-link:green:3g/brightness          # canale OFF
        echo $ancmd >> $dbcmd;;
        *) ;;
    esac
done

# Aggiunge gli sms al database SMS
cat $newsms >> $dbsms

# Svuota i file newcmd e newsms
> $newcmd
> $newsms

# Svuota memoria SMS
gnokii --deletesms ME 0 4
gnokii --deletesms SM 0 4

exit 0

save the file than:

chmod 777 /root/getsms.sh


Gnokii configuration file

edit /root/.gnokiirc:


[global]
model = AT
port = /dev/ttyUSB2
connection = serial

save the file than:

cp /root/.gnokiirc /etc/.gnokiirc


Cron configuration file (check for new SMS every 60 seconds

edit /etc/crontabs/root:

*/1 * * * * /bin/sh /root/getsms.sh

save the file than:

chmod 777 /etc/crontabs/root

-----------------------------------------------
NOTE: you can also send SMS messages from OpenWRT with gnokii using the following commandline:
echo "SMS test message from OpenWRT" | gnokii --sendsms +39393xxxxxx
-----------------------------------------------

LOGGING

Example of /root/sms/dbcmd (commands database):

On
Off
Off
On
Off
On
Off
On
Off

Example of /root/sms/dbsms (sms database):

0. Inbox Message (unread)
Date/time: 24/05/2014 15:49:29 +0200
Sender: 8214 Msg Center: +393358822000
Text:
On
0. Inbox Message (unread)
Date/time: 24/05/2014 15:50:19 +0200
Sender: 8214 Msg Center: +393358819500
Text:
Off
0. Inbox Message (unread)
Date/time: 24/05/2014 15:53:28 +0200
Sender: 8214 Msg Center: +393358822000
Text:
Off
0. Inbox Message (unread)
Date/time: 24/05/2014 16:13:19 +0200
Sender: 8214 Msg Center: +393358823500
Text:
On
0. Inbox Message (unread)
Date/time: 24/05/2014 16:14:14 +0200
Sender: 8214 Msg Center: +393358823500
Text:
Off
0. Inbox Message (unread)
Date/time: 24/05/2014 16:40:52 +0200
Sender: 8214 Msg Center: +393358819500
Text:
On
0. Inbox Message (unread)
Date/time: 24/05/2014 16:41:17 +0200
Sender: 8214 Msg Center: +393358822000
Text:
Off
0. Inbox Message (unread)
Date/time: 24/05/2014 20:13:03 +0200
Sender: 8214 Msg Center: +393358819500
Text:
On
0. Inbox Message (unread)
Date/time: 24/05/2014 20:14:14 +0200
Sender: 8214 Msg Center: +393358819500
Text:
Off

--------------------------------------------------------------

TEST

root@OpenWrt:~# gnokii --identify
GNOKII Version 0.6.21
IMEI         : 3581090248xxxxx
Manufacturer : huawei
Model        : E169
Product name : E169
Revision     : 11.314.11.00.00

1) when no SMS received:

root@OpenWrt:~# sh /root/getsms.sh
GNOKII Version 0.6.21
GetSMS ME 0 failed! (The given location is empty.)
GetSMS ME 1 failed! (The given location is empty.)
GetSMS ME 2 failed! (The given location is empty.)
GetSMS ME 3 failed! (The given location is empty.)

root@OpenWrt:~# cat /sys/devices/platform/leds-gpio/leds/tp-link:green:3g/brightness
0

THE RELAY IS OFF

2) SMS sent with On text (Date/time: 24/12/2014 17:35:05 +0100):

root@OpenWrt:~# sh /root/getsms.sh
GNOKII Version 0.6.21
(message deleted)
GetSMS ME 1 failed! (The given location is empty.)
GetSMS ME 2 failed! (The given location is empty.)
GetSMS ME 3 failed! (The given location is empty.)

Content of /root/sms/dbsms:
0. Inbox Message (unread)
Date/time: 24/12/2014 17:35:05 +0100
Sender: 8214 Msg Center: +393358822000
Text:
On

Content of /root/sms/dbcmd:
On

root@OpenWrt:~# cat /sys/devices/platform/leds-gpio/leds/tp-link:green:3g/brightness
1

THE RELAY IS ON

3) SMS sent with Off text (Date/time: 24/12/2014 17:40:25 +0100):

root@OpenWrt:~# sh /root/getsms.sh
GNOKII Version 0.6.21
(message deleted)
GetSMS ME 1 failed! (The given location is empty.)
GetSMS ME 2 failed! (The given location is empty.)
GetSMS ME 3 failed! (The given location is empty.)

Content of /root/sms/dbsms:
0. Inbox Message (unread)
Date/time: 24/12/2014 17:35:05 +0100
Sender: 8214 Msg Center: +393358822000
Text:
On
0. Inbox Message (unread)
Date/time: 24/12/2014 17:40:25 +0100
Sender: 8214 Msg Center: +393358822000
Text:
Off

Content of /root/sms/dbcmd:
On
Off

root@OpenWrt:~# cat /sys/devices/platform/leds-gpio/leds/tp-link:green:3g/brightness
0

THE RELAY IS OFF

(Last edited by pilovis on 22 Feb 2015, 16:35)

You could delete line #define TL_WR741NDV4_GPIO_LED_SYSTEM    27 and {   .name           = "tp-link:green:system",
    .gpio           = TL_WR741NDV4_GPIO_LED_SYSTEM,   .active_low     = 1,     }
on mach-tl-wr741nd-v4.c file then compile to use echo "27" > /sys/class/gpio/export
echo "out" > /sys/class/gpio/gpio27/direction
echo "1" > /sys/class/gpio/gpio27/value

(Last edited by hoatienii on 24 Dec 2014, 17:02)

When i click Swicth on or off, relay work fine but on web page it display " The CGI process did not produce any response"

hoatienii wrote:

When i click Swicth on or off, relay work fine but on web page it display " The CGI process did not produce any response"

Are You using Backfire?

If you use Attitude Adjustment the cgi code for "echo" command is different (I don't know why)

#!/bin/ash
/bin/sh /root/on
cat /www/cgi-bin/enabled.txt | mini_sendmail -fsender@domain.com -ssmtp.domain.com -p25 user@domain.com
echo ''
echo ''
/bin/cat /sys/devices/platform/leds-gpio.0/leds/HW553:blue:adsl/brightness
echo '1 = Off, 0 = On'

(Last edited by pilovis on 28 Dec 2014, 00:22)

You may add an USB Keyboard to locally control the relay board using triggerhappy.

See https://forum.openwrt.org/viewtopic.php?id=49013 for more info and instructions about Triggerhappy

I installed Openwrt Attitude Adjustment on Huawei EchoLife HG553 (Vodafone Station) with USB keyboard, USB webcam, USB 3G dongle to obtain a 3 channels remote control with the following features:

- Local control via USB keyboard/keypad
- Remote control via internet webpage
- Remote control via SMS (internet connection not needed)
- Email and SMS notification for any channel status change
- Video remote control via USB webcam (mjpg-streamer)
- Audio remote control via USB webcam's microphone (ssh arecord | aplay - alsa)

Vodafone Station has three usable channels with two leds each (red and blue), I used the blue leds to indicate channels deactivated and the red ones to indicate active channels .
Also, Vodafone Station does not have the problem that many routers have during startup sequence when all leds blink for several seconds.

You can buy single 3V/5V relay board on Ebay for about 4 Euro each

http://i00.i.aliimg.com/wsphoto/v0/1118077886/FREE-SHIPPING-font-b-3-3v-b-font-font-b-relay-b-font-module-compatible-5v.jpg

(Last edited by pilovis on 28 Dec 2014, 00:03)

Openwrt Attitude Adjustment on Huawei EchoLife HG553 (Vodafone Station)
Three channels remote control

#Channels OFF - blue leds ON - red leds OFF
# relay boards connected to blue led catodes
#
# channel 1
/bin/echo 1 > /sys/devices/platform/leds-gpio.0/leds/HW553:blue:adsl/brightness
/bin/echo 0 > /sys/devices/platform/leds-gpio.0/leds/HW553:red:adsl/brightness
# channel 2
/bin/echo 1 > /sys/devices/platform/leds-gpio.0/leds/HW553:blue:internetkey/brightness
/bin/echo 0 > /sys/devices/platform/leds-gpio.0/leds/HW553:red:internetkey/brightness
# channel 3
/bin/echo 1 > /sys/devices/platform/leds-gpio.0/leds/HW553:blue:lan/brightness
/bin/echo 0 > /sys/devices/platform/leds-gpio.0/leds/HW553:red:lan/brightness


#Channels ON- blue leds OFF - red leds ON
#relay boards connected to blue led catodes
#
# channel 1
/bin/echo 0 > /sys/devices/platform/leds-gpio.0/leds/HW553:blue:adsl/brightness
/bin/echo 1 > /sys/devices/platform/leds-gpio.0/leds/HW553:red:adsl/brightness
# channel 2
/bin/echo 0 > /sys/devices/platform/leds-gpio.0/leds/HW553:blue:internetkey/brightness
/bin/echo 1 > /sys/devices/platform/leds-gpio.0/leds/HW553:red:internetkey/brightness
# channel 3
/bin/echo 0 > /sys/devices/platform/leds-gpio.0/leds/HW553:blue:lan/brightness
/bin/echo 1 > /sys/devices/platform/leds-gpio.0/leds/HW553:red:lan/brightness

NOTE: red leds are not connected to anything, they are just used to show channels status.


-Web page example:

<meta http-equiv="refresh" content="5; URL=index.html">
<iframe
src ="/cgi-bin/test.cgi"
width="48%">
</iframe>
<br>
----------------------------------------------------------------------------------------------------------------------------------
<br>
Numero per comando da SMS: +393349xxx
<br>
testo SMS da inviare:
<br>
CANALE 1 = <b>On1</b> e <b>Off1</b> / CANALE 2 = <b>On2</b> e <b>Off2</b> / CANALE 3 = <b>On3</b> e <b>Off3</b>
<br>
----------------------------------------------------------------------------------------------------------------------------------
<br>
COMANDI CANALE 1
<p>
<FORM ACTION="/cgi-bin/off1.cgi">
<INPUT TYPE=SUBMIT VALUE="Spegni">
</FORM>
<FORM ACTION="/cgi-bin/on1.cgi">
<INPUT TYPE=SUBMIT VALUE="Accendi">
</FORM>
<p>
------------------------------------------------
<br>
COMANDI CANALE 2
<p>
<FORM ACTION="/cgi-bin/off2.cgi">
<INPUT TYPE=SUBMIT VALUE="Spegni">
</FORM>
<FORM ACTION="/cgi-bin/on2.cgi">
<INPUT TYPE=SUBMIT VALUE="Accendi">
</FORM>
<p>
------------------------------------------------
<br>
COMANDI CANALE 3
<p>
<FORM ACTION="/cgi-bin/off3.cgi">
<INPUT TYPE=SUBMIT VALUE="Spegni">
</FORM>
<FORM ACTION="/cgi-bin/on3.cgi">
<INPUT TYPE=SUBMIT VALUE="Accendi">
</FORM>
<p>
------------------------------------------------
<br>
<form action="luci.html">
<input type="submit" value="Pannello di controllo">
</form>
<p>
------------------------------------------------
<br>
<form action="http://192.168.1.143:8081/javascript_simple.html">
<input type="submit" value="Webcam">
</form>
<p>
------------------------------------------------
<p> by P.M. Lovisolo 2014
<br>
parknat12@yahoo.com


- /www/cgi-bin/test.cgi:

#!/bin/ash
echo ''
echo ''
/bin/cat /sys/devices/platform/leds-gpio.0/leds/HW553:blue:adsl/brightness
echo ''
echo ''
/bin/cat /sys/devices/platform/leds-gpio.0/leds/HW553:blue:internetkey/brightness
echo ''
echo ''
/bin/cat /sys/devices/platform/leds-gpio.0/leds/HW553:blue:lan/brightness
echo ''
echo 'Canali 1,2,3 : 1 = spento, 0 = acceso'


Important notes:
connect 3G  dongle directly to the upper USB port
Connect a powered (5V) USB HUB to the lower USB port, than connect USB webcam ad USB keyboard to the USB Hub.

http://i272.photobucket.com/albums/jj194/hedenlife/10012011003.jpg

(Last edited by pilovis on 29 Dec 2014, 11:35)

And how control via audio?

Remote Audio Monitoring
------------------------------

I used a Microsoft HD 5000 USB webcam (1280x720 px max) with integrated microphone.

opkg install kmod-usb-core kmod-usb-ohci kmod-usb-uhci
opkg install kmod-sound-core kmod-usb-audio usbutils kmod-sound-cs5535audio
opkg install kmod-sound-i8x0 kmod-sound-soc-core
opkg install kmod-usb2
opkg install alsa-utils
opkg install alsa-lib

Open port 22 TCP on the ADSL router and forward it to the Openwrt device.

to listen to the audio:
ssh root@IP_ADDRESS -p 22 arecord -r 8000 -t wav -c 1 -f S16_LE | aplay -r 8000 -t wav -c 1 -f S16_LE
note: you need to enter root password.

Note: you'd better change ssh port to a non standard value (ex. 24)

Extra stuffs.
---------------

to control the audio levels:
alsamixer
(F4 for input controls - esc to exit)

To save anytime your current audio volume level, launch (locally) the following command:
/usr/sbin/alsactl -f /etc/alsa0.state store 0

and then to restore this on boot, create the file "/etc/init.d/alsa-cfg" and put the following text:

#!/bin/sh /etc/rc.common
  START=98
  start() {                                 
  alsactl -f /etc/alsa0.state restore 0
  }

then make it executable:
chmod +x /etc/init.d/alsa-cfg

then enable it on boot with the following two commands:
/etc/init.d/alsa-cfg enable

(Last edited by pilovis on 28 Dec 2014, 11:08)

Remote Video Monitoring
------------------------------

- Microsoft HD 5000 webcam (autofocus)

opkg install kmod-video-uvc
opkg install kmod-i2c-core
opkg install kmod-video-core
opkg install kmod-usb-core
opkg install kmod-usb-uhci
opkg install kmod-usb-ohci
opkg install kmod-usb2
opkg install usbutils
opkg install kmod-video-gspca-core
opkg install kmod-video-gspca-sonixj
opkg install mjpg-streamer

than edit /etc/config/mjpg-streamer:

config mjpg-streamer core
        option enabled          "1"
        option device           "/dev/video0"
        option resolution       "640x480"
        option fps              "1"
        option www              "/www/webcam"
        option port             "8081"

note: to keep low CPU % usage do not go over 640x480 pixels resolution and 3 fps max (HD 5000 can go up to 1280x720 px)

enable mjpg-streamer at boot:
/etc/init.d/mjpg-streamer enable

Open port 8081 TCP on the ADSL router and forward it to the Openwrt device.

to see the webcam:
http://IP_ADDRESS:8081

(Last edited by pilovis on 28 Dec 2014, 11:02)

pilovis wrote:

- Microsoft HD 5000 webcam (autofocus)

opkg install kmod-video-uvc
opkg install kmod-i2c-core
opkg install kmod-video-core
opkg install kmod-usb-core
opkg install kmod-usb-uhci
opkg install kmod-usb-ohci
opkg install kmod-usb2
opkg install usbutils
opkg install kmod-video-gspca-core
opkg install kmod-video-gspca-sonixj
opkg install mjpg-streamer

You certainly do not need kmod-video-gspca-core and kmod-video-gspca-sonixj for a UVC webcam, which the HD5000 is.

kmod-usb-uhci and kmod-usb-ohci should'nt be necessary for a USB 2.0 webcam, which the HD5000 is.

usbutils is nice to have, but not needed for webcam support (although lsusb can be a great help)

tmo26 wrote:

You certainly do not need kmod-video-gspca-core and kmod-video-gspca-sonixj for a UVC webcam, which the HD5000 is.

kmod-usb-uhci and kmod-usb-ohci should'nt be necessary for a USB 2.0 webcam, which the HD5000 is.

usbutils is nice to have, but not needed for webcam support (although lsusb can be a great help)

kmod-video-gspca-sonixj (JPEG) is necessary for Mjpeg streaming!
Also, without kmod-video-gspca-core, HD5000 & Mjpg-streamer do not work.

kmod-usb-uhci and kmod-usb-ohci are not necessary just for video streaming, but do not hurt smile, you need them for the others features described above.

(Last edited by pilovis on 28 Dec 2014, 11:46)

pilovis wrote:

kmod-video-gspca-sonixj (JPEG) is necessary for Mjpeg streaming!
Also, without kmod-video-gspca-core, HD5000 & Mjpg-streamer do not work.

Nope, just checked it out with my HD5000: Streaming works perfectly without the above kmods.

My web control page run on php.
I install php and lighttpd.

my   /www/index.php

<?php
session_start();
$up = array(
    'u'    => "d033e22ae348aeb5660fc2140aec35850c4da997",
    'p'    => "d033e22ae348aeb5660fc2140aec35850c4da997"
);
if(isset($_POST['login']) && $up['u']===sha1($_POST['username']) && $up['p']===sha1($_POST['password'])){
    $_SESSION['username'] = $_POST['username'];
    $_SESSION['password'] = $_POST['password'];
};
if(isset($_POST['logout'])){
    unset($_SESSION['username']);
    unset($_SESSION['password']);
}

if(isset($_SESSION['username']) && isset($_SESSION['password'])){
    if($up['u']===sha1($_SESSION['username']) && $up['p']===sha1($_SESSION['password'])){
        if(isset($_POST['router'])) {
            $contents = file_get_contents("{$_SERVER['DOCUMENT_ROOT']}./{$_POST['router']}.sh");
            echo shell_exec($contents);
        }
        ?>
        <style>
            form{
                width: 226px;
            }
            input{
                margin-top: 5px;
                margin-bottom: 5px;
                color: #fff;
                background-color: #449d44;
                border-color: #398439;
                text-decoration: none;
                display: inline-block;
                padding: 6px 12px;
                font-weight: 400;
                line-height: 1.42857143;
                background-image: none;
                border: 1px solid transparent;
                border-radius: 4px;
                font-family: inherit;
                -webkit-appearance: button;
                cursor: pointer;
                text-transform: none;
                overflow: visible;
                width: 100px;
                font-size: 14px;
            }
            @media only screen and (max-device-width: 480px){
                form{
                    width: 100%;
                }
                input {
                    width: 100%;
                    height: 100px;
                    font-size: 50px;
                }
            }
        </style>
        <form method="post" action="<?php echo $_SERVER['PHP_SELF']; ?>">
            <input type="submit" name="router" value="on_one"><br>
            <input type="submit" name="router" value="off_one"><br>
            <input type="submit" name="logout" value="Log Out"><br> 
        </form>
        <?php
    } else {
        // clear session
        unset($_SESSION['username']);
        unset($_SESSION['password']);
    }
}else{
    ?>
        <style>
            form{
                margin: 0 auto;
                padding: 20px;
                width: 226px;
            }
            input {
                margin: 10px 0px 10px 10px;
                width: 173px;
                width: 100px;
                font-size: 14px;
            }
            input[type="submit"] {
                padding: 5px;
                width: 70px;
                float: right;
            }
            @media only screen and (max-device-width: 480px){
                form{
                    width: 100%;
                }
                input {
                    width: 100%;
                    height: 100px;
                    font-size: 50px;
                }
                input[type="submit"] {
                    width: 100%;
                }
            }
        </style>
        <form method="post" action="<?php echo $_SERVER['PHP_SELF']; ?>">
            User : <input type="text" name="username"><br>
            Pass : <input type="password" name="password"><br>
            <input type="submit" name="login" value="Login">
        </form>
    <?php
    
}
?>

put on_one.sh and off_ond.sh into /www folder

on_one.sh: echo "0" > /sys/class/gpio/gpio2/value
off_one.sh: echo "1" > /sys/class/gpio/gpio2/value

change user and pass line:

    'u'    => "d033e22ae348aeb5660fc2140aec35850c4da997",
    'p'    => "d033e22ae348aeb5660fc2140aec35850c4da997

my example is user/pass is admin
go to http://www.sha1-online.com/ create sha for user and pass

(Last edited by hoatienii on 28 Dec 2014, 16:17)

in case you do not have any internet connectivity and want to have the channel status report sent by SMS:

- create empty DB file /root/status (just once)
touch /root/status

- edit /root/sms-status:

####################################
# Openwrt + USB dongle + Gnokii
#
# Write channel status to file
####################################

# Variabili
folder=/root    # Cartella di destinazione
dbstatus=$folder/status    # File Status

# Cancella file /root/status
rm /root/status

# Aggiunge status canali al file
echo "Status canali 1,2,3 : 1=Off, 0=On" >> $dbstatus
cat  /sys/devices/platform/leds-gpio.0/leds/HW553:blue:adsl/brightness >> $dbstatus
cat  /sys/devices/platform/leds-gpio.0/leds/HW553:blue:internetkey/brightness >> $dbstatus
cat  /sys/devices/platform/leds-gpio.0/leds/HW553:blue:lan/brightness >> $dbstatus
exit 0

than:
chmod 777 /root/sms-status


- edit /www/cgi-bin/sms.cgi:

#!/bin/ash
/bin/sh /root/sms-status
cat /root/status | gnokii --sendsms +393336xxxxxx
cat /root/status | mini_sendmail -fsender@domain.com -ssmtp.provider.com -p25 user@domain.com

note: this cgi sends channels status by SMS and email, if you don't need email notification delete the last line.

than:
chmod 777 /www/cgi-bin/sms.cgi

to get the status by SMS run:
sh /www/cgi-bin/sms.cgi

- [Optional] Cron configuration file (sends channels status by email every night at 00:00):

edit /etc/crontabs/root ad add the following line:

0 0 * * * cat /root/status | mini_sendmail -fsender@domain.com -ssmtp.provider.com -p25 user@domain.com
----------------------------------------------------------------

Modifications to file "/root/getsms.sh" file for three channels control and Status feedback by SMS:

...
# Analizza i comandi
for ancmd in $(cat $newcmd)
do
    case $ancmd
    in
        On1) /www/cgi-bin/on1.cgi          # Canale 1 ON + email
        echo $ancmd >> $dbcmd;;
        Off1) /www/cgi-bin/off1.cgi          # Canale 1 OFF + email
        echo $ancmd >> $dbcmd;;
        On2) /www/cgi-bin/on2.cgi          # Canale 2 ON + email
        echo $ancmd >> $dbcmd;;
        Off2) /www/cgi-bin/off2.cgi          # Canale 2 OFF + email
        echo $ancmd >> $dbcmd;;
        On3) /www/cgi-bin/on3.cgi          # Canale 3 ON + email
        echo $ancmd >> $dbcmd;;
        Off3) /www/cgi-bin/off3.cgi          # Canale 3 OFF + email
        echo $ancmd >> $dbcmd;;
        Status) /www/cgi-bin/sms.cgi      # Aggiorna status canali lo manda per SMS
        echo $ancmd >> $dbcmd;;
        *) ;;
    esac
done

...

Note: remember to create "/www/cgi-bin/on(x).cgi" and "/www/cgi-bin/off(x).cgi" files

(Last edited by pilovis on 29 Dec 2014, 11:32)

Please note this device can be fully controlled and monitored by SMS, without needing any internet connectivity smile
This sounds quite strange for a router big_smile , but is very helpful if you want to remote control something in distant areas where there is no internet coverage, or you want to keep full control on it, even if there is an internet outage.
Obviously if you have Internet connectivity (Wi-fi/3G/LAN) you'll have more options available, like audio and video remote monitoring.

(Last edited by pilovis on 28 Dec 2014, 17:59)

I've just added another feature to this Home Automation Server:
Auto-restore of previous channels status after a reboot/crash/power outage

You'll find all my "ready-to-use" configuration files and script, for Vodafone Station Huawei EchoLife HG553 + OpenWRT Attitude Adjustment, here:
http://www.lovisolo.com/asterisk/softwa … on-Server/

If you want to use a different router, you'll just need to change the "/sys/devices/platform/leds-gpio..." trigger lines, with the ones suitable for your board.

Complete list of the board functionalities (using my files above):

- Three (or six) indipendent channels output (via simple relays board)
- Multiple input control (USB keyboard/USB keypad/USB mouse keys) with triggerhappy
- Full local control via keyboard/keypad/mouse
- Full local monitoring via red/blue leds on the router
- Full remote/local control/monitoring via internet webpage
- Full remote control/monitoring via SMS (internet connection not needed)
- Email and/or SMS notification for any channel status change
- Automatic restore of the previous channels status after a reboot/crash
- Realtime video remote/local control via USB webcam (mjpg-streamer)
- Realtime audio remote/local control via USB webcam's microphone (ssh arecord | aplay - alsa)

Web Control/Monitoring Page (including Luci & Webcam):

http://IP_Address/index.html

List of remote SMS commands:

On1 = Activate Channel 1
On2 = Activate Channel 2
On3 = Activate Channel 3
Off1 = Deactivate Channel 1
Off2 = Deactivate Channel 2
Off3 = Deactivate Channel 3
Status = Send all channels status by SMS

List of local USB Keyboard control keys

F1 = Activate Channel 1
F2 = Activate Channel 2
F3 = Activate Channel 3
F4 = Deactivate Channel 1
F5 = Deactivate Channel 2
F6 = Deactivate Channel 3
F9 = Activate All Channels
F10 = Deactivate All Channels

Enjoy smile


Final notes: with Vodafone Station Huawei EchoLife HG553, you can have up to six indipendent output channels if you control and use both, red and blue leds, to drive the relays.

(Last edited by pilovis on 29 Dec 2014, 19:17)

Could you give how to control relay with keyboard? Thanks!

hoatienii wrote:

Could you give how to control relay with keyboard? Thanks!

It is implemented in my triggerhappy configuration file (/etc/triggerhappy/triggers.d/example.conf)
   
    opkg update
    opkg install kmod-usb-hid
    opkg install kmod-hid kmod-hid-generic
    opkg install triggerhappy
    opkg install kmod-button-hotplug
    opkg install kmod-gpio-button-hotplug

launch the following command to find "eventcodes" for available buttons (KEY_LABEL):
    thd --dump /dev/input/event*

example (press a key):

root@OpenWrt:~# thd --dump /dev/input/event*
EV_KEY    KEY_KP5    1    /dev/input/event0
# KEY_KP5    1    command
EV_KEY    KEY_KP5    2    /dev/input/event0
# KEY_KP5    2    command
EV_KEY    KEY_KP5    2    /dev/input/event0
# KEY_KP5    2    command
EV_KEY    KEY_KP5    2    /dev/input/event0
# KEY_KP5    2    command
EV_KEY    KEY_KP5    0    /dev/input/event0
# KEY_KP5    0    command
EV_KEY    KEY_KP1    1    /dev/input/event0
# KEY_KP1    1    command
EV_KEY    KEY_KP1    0    /dev/input/event0
# KEY_KP1    0    command
EV_KEY    KEY_KP1    1    /dev/input/event0
# KEY_KP1    1    command
EV_KEY    KEY_KP1    0    /dev/input/event0
# KEY_KP1    0    command

Note: A value of 1 corresponds to pressing a key, while 2 is generated by holding it; releasing it yields a value of 0.


edit /etc/triggerhappy/triggers.d/example.conf:

# This is an example configuration for the triggerhappy daemon (thd)
# please note that every file to be processed must end in ".conf"
# To view a list of supported event codes, use "thd --listevents" or
# "thd --dump /dev/input/event*"
#
# Format:
# <eventcode> <value> <command>
# values for key events are 1 (pressed), 0 (released) or 2 (held)
#
KEY_F1 /bin/sh /root/1on
KEY_F2 /bin/sh /root/2on
KEY_F3 /bin/sh /root/3on
KEY_F4 /bin/sh /root/1off
KEY_F5 /bin/sh /root/2off
KEY_F6 /bin/sh /root/3off
KEY_F9 /bin/sh /root/allon
KEY_F10 /bin/sh /root/alloff
#eof

Note: you may need to adjust the "KEY_LABELS" if you use a different keyboard from mine or if you want to use just a small USB keypad, check your keyboard/keypad with the command thd --dump /dev/input/event* and than press the desired key to see its Key_label name.

than:
/etc/init.d/triggerhappy enable
/etc/init.d/triggerhappy start

(Last edited by pilovis on 10 Jan 2015, 11:53)

Now I did the dirty job smile but still need to implement the followings features:

- Withelist for the authorized SMS senders, only authorized numbers can issue commands to the router.
- Simple autentication login with password for the control web page by inserting the control panel into a custom luci module (preferred) or using something like htpasswd.
- Graphical indications for the channels status on the web control page (ex. red and green dots).

Is anyone willing to help me?
Please do not use PHP, it's too resources costly for this small router wink

(Last edited by pilovis on 29 Dec 2014, 19:56)

Use USB drive for more storage. My router dlink dir615c2 400mhz,4MB flash, i use usb drive for more storage to install php and lighttpd. My web control run php with display status of relay.
Here my index.php

<?php
@ob_start();
session_start();
$up = array(
    'u'    => "d033e22ae348aeb5660fc2140aec35850c4da997",
    'p'    => "d033e22ae348aeb5660fc2140aec35850c4da997"
);
if(isset($_POST['login']) && $up['u']===sha1($_POST['username']) && $up['p']===sha1($_POST['password'])){
    $_SESSION['username'] = $_POST['username'];
    $_SESSION['password'] = $_POST['password'];
};
if(isset($_POST['logout'])){
    unset($_SESSION['username']);
    unset($_SESSION['password']);
}

if(isset($_SESSION['username']) && isset($_SESSION['password'])){
    if($up['u']===sha1($_SESSION['username']) && $up['p']===sha1($_SESSION['password'])){
        
        $arrMode = array(
            'status0'    => 'cat /sys/class/gpio/gpio0/value',
            'on one'    => "echo '0' > /sys/class/gpio/gpio0/value", 
            'off one'    => "echo '1' > /sys/class/gpio/gpio0/value",
            'status2'    => 'cat /sys/class/gpio/gpio2/value',
            'on two'    => "echo '0' > /sys/class/gpio/gpio2/value", 
            'off two'    => "echo '1' > /sys/class/gpio/gpio2/value", 
            'status7'    => 'cat /sys/class/gpio/gpio7/value',
            'on three'    => "echo '0' > /sys/class/gpio/gpio7/value", 
            'off three'    => "echo '1' > /sys/class/gpio/gpio7/value", 
            'status9'    => 'cat /sys/class/gpio/gpio9/value',
            'on four'    => "echo '0' > /sys/class/gpio/gpio9/value", 
            'off four'    => "echo '1' > /sys/class/gpio/gpio9/value", 
        );
        
        if(isset($_POST['router'])) {
            // $contents = file_get_contents("{$_SERVER['DOCUMENT_ROOT']}./{$_POST['router']}.sh");
            echo shell_exec($arrMode[$_POST['router']]);
        }
        $status0 = shell_exec($arrMode['status0']);
        $status2 = shell_exec($arrMode['status2']);
        $status7 = shell_exec($arrMode['status7']);
        $status9 = shell_exec($arrMode['status9']);
        ?>
        <style>
            form{
                width: 226px;
            }
            input{
                margin-top: 5px;
                margin-bottom: 5px;
                color: #fff;
                text-decoration: none;
                display: inline-block;
                padding: 6px 12px;
                font-weight: 400;
                line-height: 1.42857143;
                background-image: none;
                border: 1px solid transparent;
                border-radius: 4px;
                font-family: inherit;
                -webkit-appearance: button;
                cursor: pointer;
                text-transform: none;
                overflow: visible;
                width: 100px;
                font-size: 14px;
            }
            input.on{
                background-color: #449d44;
                border-color: #398439;
            }
            input.off{
                background-color: #E40606;
                border-color: #E40606;
            }
            @media only screen and (max-device-width: 480px){
                form{
                    width: 100%;
                }
                input {
                    width: 100%;
                    height: 100px;
                    font-size: 50px;
                }
            }
        </style>
        <form method="post" action="<?php echo $_SERVER['PHP_SELF']; ?>">
            <input class="<?php if((int)($status0)==0) echo 'on'; else echo 'off';?>" type="submit" name="router" value="<?php if((int)($status0)==1) echo 'on'; else echo 'off';?> one"><br>
            <input class="<?php if((int)($status2)==0) echo 'on'; else echo 'off';?>" type="submit" name="router" value="<?php if((int)($status2)==1) echo 'on'; else echo 'off';?> two"><br>
            <input class="<?php if((int)($status7)==0) echo 'on'; else echo 'off';?>" type="submit" name="router" value="<?php if((int)($status7)==1) echo 'on'; else echo 'off';?> three"><br>
            <input class="<?php if((int)($status9)==0) echo 'on'; else echo 'off';?>" type="submit" name="router" value="<?php if((int)($status9)==1) echo 'on'; else echo 'off';?> four"><br>
            <hr>
            <input class="off" type="submit" name="logout" value="Log Out"><br> 
        </form>
        <?php
    } else {
        // clear session
        unset($_SESSION['username']);
        unset($_SESSION['password']);
    }
}else{
    ?>
        <style>
            form{
                margin: 0 auto;
                padding: 20px;
                width: 226px;
            }
            input {
                margin: 10px 0px 10px 10px;
                width: 173px;
                width: 100px;
                font-size: 14px;
            }
            input[type="submit"] {
                padding: 5px;
                width: 70px;
                float: right;
            }
            @media only screen and (max-device-width: 480px){
                form{
                    width: 100%;
                }
                input {
                    width: 100%;
                    height: 100px;
                    font-size: 50px;
                }
                input[type="submit"] {
                    width: 100%;
                }
            }
        </style>
        <form method="post" action="<?php echo $_SERVER['PHP_SELF']; ?>">
            User : <input type="text" name="username"><br>
            Pass : <input type="password" name="password"><br>
            <input type="submit" name="login" value="Login">
        </form>
    <?php
    
}
?>

default user/pass is admin/admin

https://lh3.googleusercontent.com/-pftJGLXMhp4/VKCSpCYgBvI/AAAAAAAAJnQ/p5fQk3NcgVE/w361-h577-no/Screenshot_2014-12-29-01-44-26.png

https://lh6.googleusercontent.com/-s5nRG3GUGLk/VKCSoE9bjSI/AAAAAAAAJnE/52m9UF1kNBQ/w361-h577-no/Screenshot_2014-12-29-01-44-05.png

(Last edited by hoatienii on 30 Dec 2014, 03:49)

Nice smile

Good job!

Only triggerhappy package for support keyboard?

(Last edited by hoatienii on 30 Dec 2014, 07:35)